
New product development, explained for buyers
The short answer
A new plastic part goes through nine steps before it reaches your warehouse. Most projects take 4 to 8 months, shipping included. You approve five checkpoints along the way. The mold is your biggest single cost. Design changes after steel is cut are your biggest risk.
- Define the part
- 3D design
- Make it mold-friendly
- Prototype and test
- Order the mold
- Mold making
- Samples and fixes
- Pilot run
- Production and shipping
You have an idea for a plastic product. Maybe it’s a sketch on a napkin. Maybe it’s an old part you want to improve. Either way, the next question is the same: what actually happens between here and a carton of finished parts?
I’ve built molds at Topworks for over 20 years. First-time buyers rarely fail on engineering. They fail on surprises. A mold costs double the guess. A “small” change adds six weeks. A sample gets approved without anyone testing the fit.
This guide removes those surprises. It walks through the whole journey in plain words. Each step covers what happens, what you do, how long it takes, and what it costs. Use the map below to jump around.
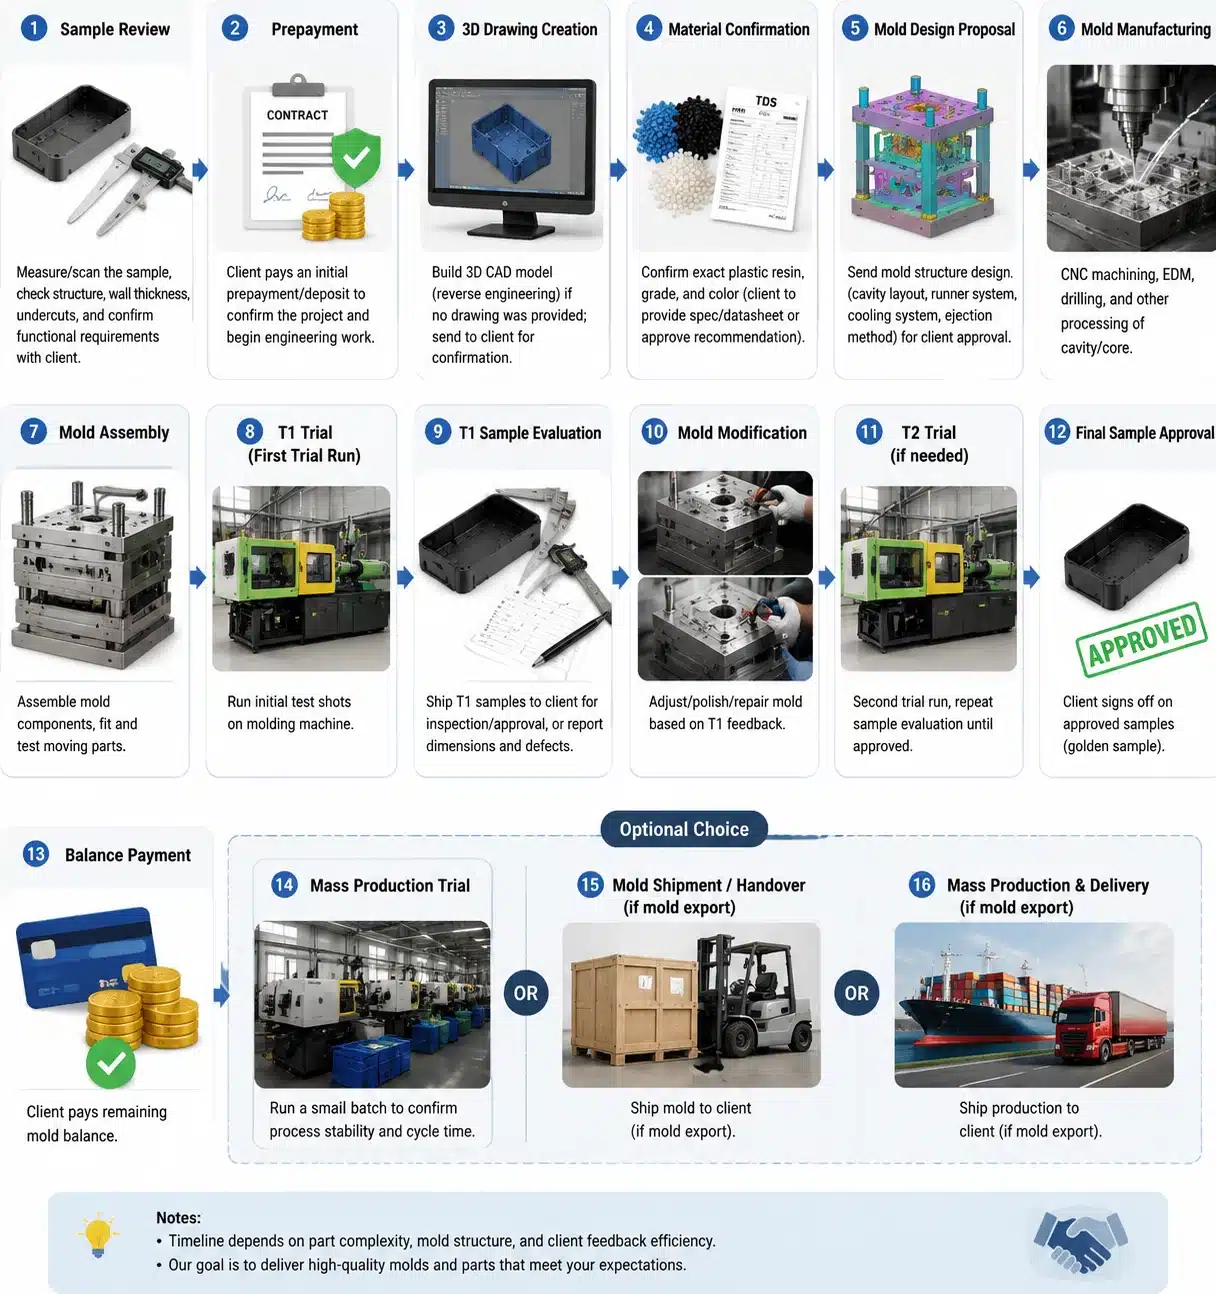
The whole journey on one map
Tap a step to see the details. Not sure how far along you are? Use “Find the step you’re on” and answer a few yes-or-no questions.
The 9 steps from idea to delivered parts
Tap any step. Green diamonds mark the five points where you sign off.
Step 1: Write down what the part must do
Before anyone draws or quotes, put your idea into plain words. One page here saves weeks later.
- What happens
- You list what the part does, where it’s used, its rough size, and how it should look. You add how many you need per year and your target price per part.
- Your job
- Answer the basics: What does it hold, protect, or connect? Indoors or outdoors? Food contact or kids’ use? Color and feel? Yearly quantity? Target price?
- What you get
- A short product brief both sides agree on, plus a rough budget range for the whole project.
- Typical time
- 1–2 weeks
- Typical cost
- Free. A good factory helps you write it.
Common mistake: Leaving out the target price. Without it, nobody can choose between a $4,000 mold and a $20,000 mold.
Words you’ll hear, in plain English
Factories use a lot of shop talk. You don’t need to learn it, but knowing these words makes every email easier.
| Word | What it means |
|---|---|
| CAD file (3D file) | The computer model of your part. Factories want STEP or IGES files. |
| DFM | Design for manufacturing. An engineer checks your part can be molded well, then suggests fixes. |
| Mold (or tool) | A steel block with a part-shaped hollow inside. Hot plastic fills it, cools, and pops out. |
| Cavity | One part-shaped hollow. A 4-cavity mold makes four parts each cycle. |
| Draft | A slight taper on the sides so the part slides out, like a paper cup. |
| Undercut | A hook or side hole that locks the part inside the mold. It needs extra moving mold parts. |
| Gate | The small opening where plastic enters. It leaves a tiny mark on the part. |
| T1, T2 | The first and second test runs of a new mold. |
| Golden sample | The approved part. Production parts are judged against it. |
| Lead time | How long from your order until the goods are ready. |
| MOQ | Minimum order quantity. The smallest order a factory accepts. |
Step 1 of 9
Define what the part must do
Every good project starts with a one-page brief. It doesn’t need to be technical. It needs to be honest and specific.
Why does this matter so much? Because two parts can look identical and cost very different amounts. A storage bin for a garage and a bin for a hospital share a shape. They don’t share a plastic, a finish, or a mold.
What to put in your brief
- The job: what the part does, in one sentence.
- Where it lives: indoors, outdoors, in a car, a kitchen, a bathroom.
- Rules it must meet: food contact, children’s products, flame ratings, RoHS.
- Look and feel: color, glossy or matte, logo, texture.
- What it touches: screws, lids, circuit boards, other parts.
- Quantity: your first order and a yearly estimate.
- Money: target price per part and total budget.
- Deadline: the launch date you can’t miss.
Don’t hide your target price. Engineers aren’t trying to spend all of it. They need it to pick the right path. A $4,000 mold and a $20,000 mold can make similar-looking parts. Your volume and budget decide which one fits.
Checkpoint 1: Brief agreed. You and the factory confirm the brief in writing. Every later decision gets checked against it.
Step 2 of 9
Turn the idea into a 3D design
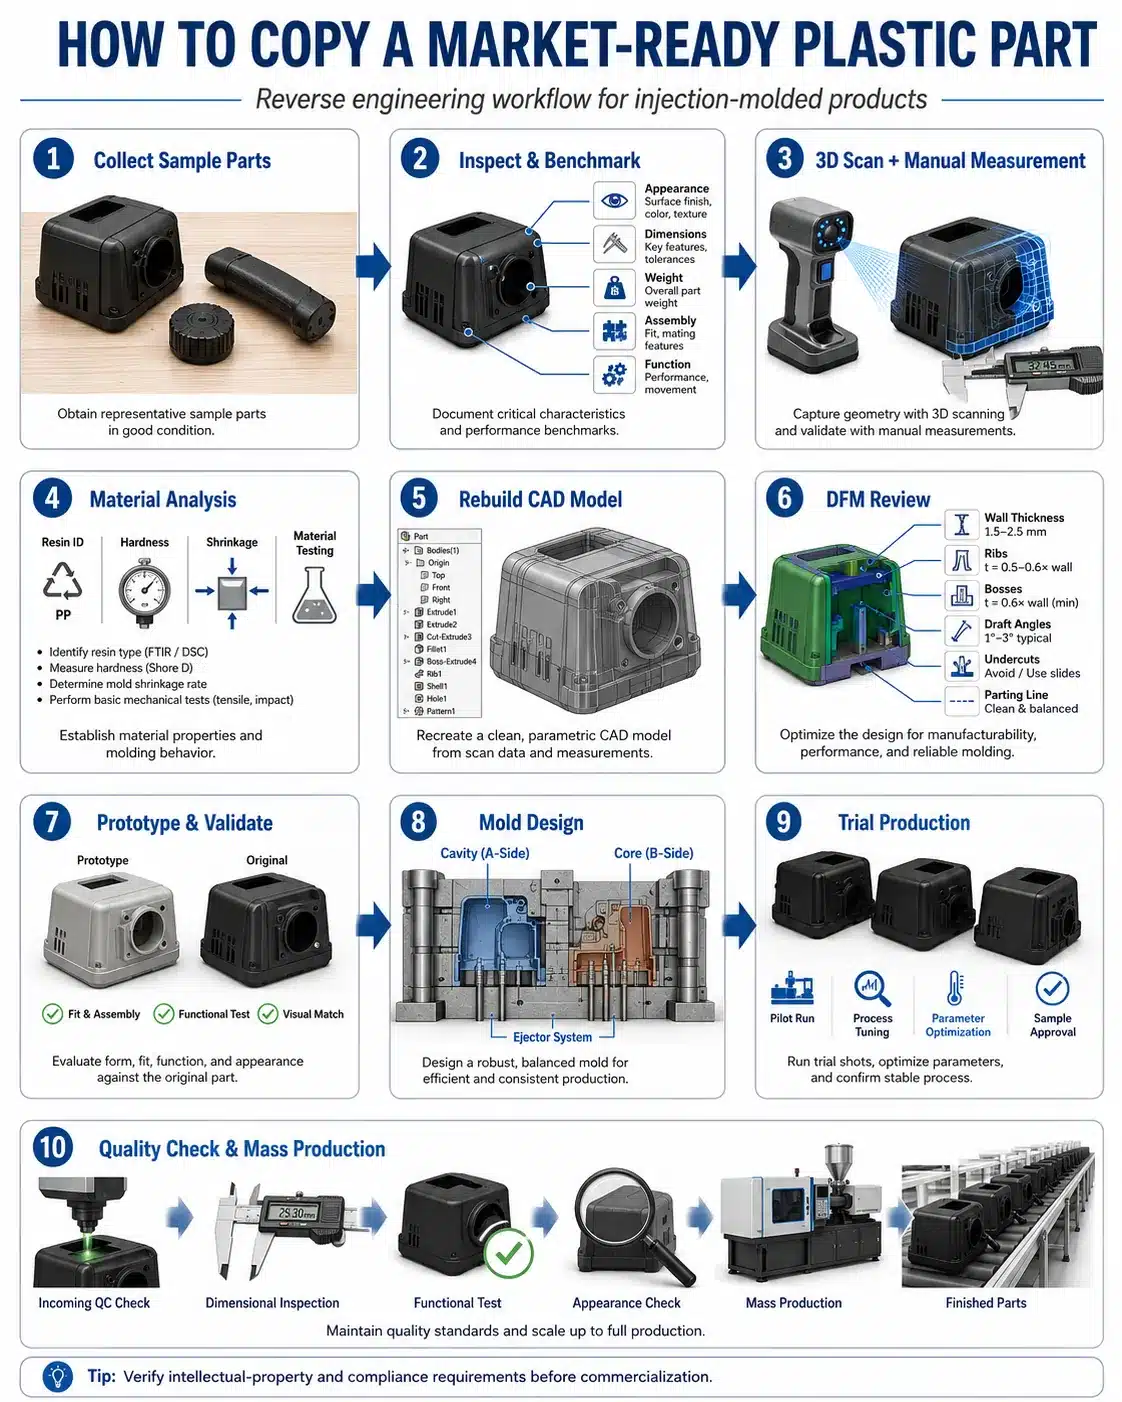
A factory can’t quote or build from a sketch alone. It needs a 3D CAD file. That file becomes the master copy the mold is cut from.
| What you have now | What happens next | Typical time |
|---|---|---|
| An idea or a hand sketch | A product designer builds the 3D model from scratch. Expect a few review rounds. | 1–8 weeks |
| A photo or an existing sample | The sample is measured or 3D-scanned, then rebuilt as a clean model. | 1–5 weeks |
| 3D files already done | Skip ahead to the design check in Step 3. | 0 |
Send the designer everything. Photos with a ruler in the shot help a lot. So do the parts your new part must fit with. If it clips onto a bottle, send the bottle.
Ask for two things at the end. First, STEP files of the part. Second, a simple 2D drawing that marks the sizes that really matter. Engineers call the allowed variation “tolerance.” In plain words: how far each size may drift before the part stops working.
Protect your design
- Get it in writing that you own the design files.
- Sign an NDA before sending anything sensitive. A China-specific NNN agreement gives stronger protection there.
- Keep your own copy of every file version.
Step 3 of 9
Make the design mold-friendly and pick the plastic
Here’s the thing most first-time buyers never hear. A mold opens in one straight direction. The part has to slide out cleanly, like jelly from a jelly mold.
Anything that fights that straight pull causes trouble. A side hole, a hook, or a backward angle traps the part. So a molding engineer reviews your 3D file before any steel is cut. This review is called DFM.
What the design check looks for
- Even walls. Thick spots cool slowly and shrink, leaving dents on the surface.
- A slight taper on the sides. Perfectly straight walls scrape and stick when the part comes out.
- Rounded inside corners. Sharp corners are where cracks start.
- Hooks and side holes. They need moving pieces inside the mold, which add cost.
- Where the plastic enters. It leaves a small mark, so you choose where it hides.
You’ll get a DFM report with pictures. Each problem is circled, with a suggested fix. Read it carefully and ask “why?” for anything unclear. A good engineer will happily explain.
Choosing the plastic
Don’t pick plastic from a list. Describe the real conditions and let the engineer suggest a grade. Still, it helps to know the common families.
| Plastic | You’ve seen it in | Good at | Watch out for |
|---|---|---|---|
| PP | Food tubs, bottle caps, flip-top hinges | Flexible, chemical-resistant, low cost | Hard to glue or paint |
| ABS | Electronics housings, toys, vacuum cleaners | Tough, good surface, easy to color | Fades and gets brittle in sunlight |
| PC | Safety glasses, clear covers, light lenses | Very strong, can be crystal clear | Scratches, costs more |
| PA (nylon) | Gears, cable ties, power tool parts | Strong, wears well | Soaks up moisture, size changes slightly |
| POM (acetal) | Buckles, small gears, zipper pulls | Slippery, precise, springy | Almost impossible to glue |
| PE | Squeeze bottles, lids, crates | Flexible, cheap, food-safe grades | Soft, handles heat poorly |
| TPE | Soft grips, seals, toothbrush handles | Rubbery feel | Needs careful bonding to hard plastic |
Price per kilo matters less than you think. On a small part, a better plastic may add a few cents. A cracked part in the field costs far more.
Step 4 of 9
Build a prototype and test it
This is the cheapest place to find a mistake. A prototype is a handful of parts made without a mold. You hold it, fit it, drop it, and show it to real users.
| 3D printing | CNC machining | Silicone (vacuum) casting | |
|---|---|---|---|
| Best for | Checking shape and size fast | Strength and fit tests in real plastic | 10–50 good-looking parts for photos or user tests |
| How many | 1–10 | 1–20 | 10–50 |
| Time | 2–5 days | 5–10 days | 10–15 days |
| How close to the real part | Right shape, weaker, rougher surface | Very close, real material | Very close in look, similar feel |
| Rough cost | $10–$200 per part | $80–$800 per part | $300–$1,000 setup, then $20–$150 per part |
How to test a prototype
- Assemble it with the real screws, lids, and circuit boards.
- Drop it from the height it will fall in real life.
- Open and close any clip 50 times.
- Hand it to three people who haven’t seen it and watch.
- Write every change in one list, then decide on all of them together.
Why the design freeze matters so much
After testing, you freeze the design. That means no more changes. It sounds strict, but look at what one change costs at different moments. Try it yourself below.
What does a late design change really cost?
Choose a change, then slide to the moment you ask for it.
Typical ranges for a small to mid-size part molded in China. The lesson holds for any project: the same change gets far more expensive once steel is cut.
Notice the “thicker wall” case. Making a part thicker means cutting steel away, which is easy. Making it thinner means adding steel back, which is not. Engineers call the easy direction “steel safe.” If you’re unsure about a size, ask the factory to build it steel safe.
Checkpoint 2: Design freeze. You confirm in writing that the 3D file is final. From here, every change touches steel.
Step 5 of 9
Get the quote, order the mold, approve the mold plan
Your quote has two separate numbers. The mold price is paid once. The part price is paid on every order, for as long as you buy.
Five things drive the mold price: part size, complexity, number of cavities, steel grade, and surface finish. Moving pieces for hooks and side holes add the most. A high-gloss or textured surface also adds polishing time.
| Mold type | Built to make about | Good for |
|---|---|---|
| Quick mold (aluminum or soft steel) | 1,000–10,000 parts | Market tests, launches, bridging to a steel mold |
| Pre-hardened steel (P20, 718) | 100,000–500,000 parts | Most consumer and industrial products |
| Hardened steel (H13, S136) | 500,000 to over 1,000,000 parts | High volume, glass-filled plastics, medical, clear parts |
More cavities make the mold pricier but each part cheaper. For a few thousand parts a year, one or two cavities is usually right. For a million, eight or more may pay off.
So when does a mold make sense at all? Put your own quotes into the calculator. It shows the real cost per part once the mold price is spread across your order.
When does paying for a mold make sense?
A mold costs a lot once, then each part is cheap. Enter your numbers and drag the quantity.
“Real cost per part” = mold price spread over your quantity + part price. The mold is paid once and stays yours for reorders, so the second order costs only the part price.
Compare quotes on the same terms
- Steel grade and promised mold life
- Number of cavities and cycle time
- How many sample rounds are included
- Date of the first samples (T1)
- Who pays for fixes, and what counts as your change
- That you own the mold, in writing
A quote that looks 40% cheaper often uses softer steel, fewer cooling lines, or fewer sample rounds. Ask each supplier the same questions before you compare prices. Our ordering process guide covers what a clean order looks like.
After you order, the engineer draws the mold layout. It shows where plastic flows in, where the mold splits, and where small marks will sit. Look at it with one question in mind: will any mark land on a surface customers see?
Checkpoint 3: Mold design approved. You sign off on the layout. Steel cutting starts right after.
Step 6 of 9
The factory builds your mold
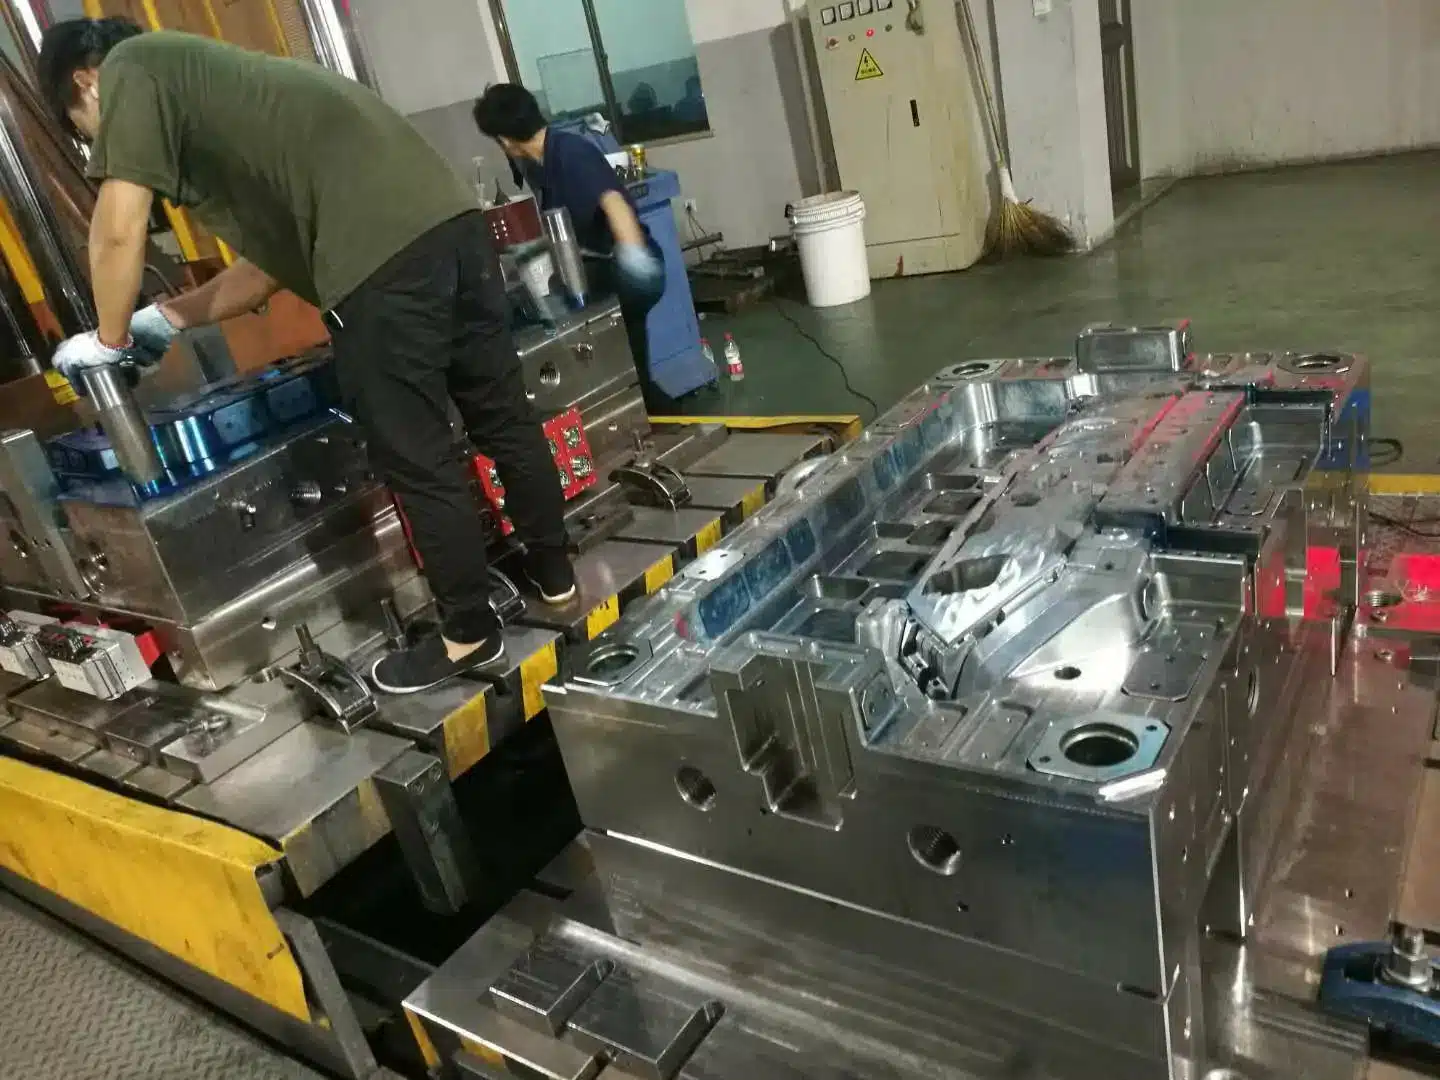
This is the longest wait, usually 4 to 10 weeks. A raw block of steel becomes a tool accurate to a few hundredths of a millimeter.
- Order the steel
- Rough cutting
- Heat treatment
- Fine CNC cutting
- Spark machining (EDM) for details
- Fitting the two halves
- Polishing or texture
- Assembly
Curious what’s inside a finished mold? Click the parts below.
Main components of a plastic injection mold
- Core and Cavity — form the shape of the plastic part.
- Runner System — guides molten plastic into the cavity.
- Gate — entry point where plastic flows into the part.
- Cooling Channels — cool the plastic quickly and evenly.
- Ejector Pins — push the finished part out of the mold.
- Slider or Lifter — release side holes and undercuts.
Your job during this wait is simple. Ask for weekly progress photos. Keep the design frozen. Use the time to plan packaging, labels, and your inspection checklist. Then nothing waits on you once samples are approved.
Step 7 of 9
First samples and fixes
The finished mold goes into a molding machine for its first test, called T1. The factory molds parts, measures them, and ships you samples with a size report.
Small issues at T1 are normal. Honestly, a perfect T1 is rare. What matters is how fast and how clearly problems get fixed.
| What you see on the sample | What the factory calls it | Usually fixed by |
|---|---|---|
| A shallow dent on a flat surface | Sink mark | Machine settings, sometimes thinner walls |
| A thin fin of extra plastic along an edge | Flash | Refitting the mold halves |
| A corner or rib not fully formed | Short shot | More pressure, better air vents |
| The part is bent or won’t sit flat | Warpage | Cooling changes, sometimes design |
| A faint line where two flows meet | Weld line | Temperature, gate position |
| A snap fit too tight or too loose | Dimension out of tolerance | Adjusting steel |
Want to recognize defects on sight? Our interactive molding tools include a defect finder with pictures.
Approving samples the right way
- Test fit and function with the real mating parts, not looks alone.
- Measure only the sizes marked as critical on your drawing.
- Send feedback in one message, with photos and circled problems.
- Sign and date two identical golden samples. You keep one, the factory keeps one.
Who pays for fixes? If the part doesn’t match the frozen design, the factory fixes it free. If you change the design, you pay. That’s why Checkpoint 2 matters.
Checkpoint 4: Golden sample approved. The mold stage is finished. The mold balance is usually paid now.
Step 8 of 9
Run a small pilot batch
A few good samples don’t prove the mold can run all day. So before a big order, the factory runs a pilot batch. That’s usually a few hundred to a few thousand parts, at full speed, for hours.
During the pilot, the factory locks the machine settings and writes the inspection plan. You inspect the parts, or hire an inspector. You also try them on your own assembly line and confirm packing and labels.
Skipping this step is tempting. Don’t. Some problems only appear after hours of running, like sizes that slowly drift as the mold heats up.
Checkpoint 5: Production release. You approve the pilot parts and give the go-ahead for full production.
Step 9 of 9
Mass production, inspection, and shipping
Now the mold runs day and night. Your role shifts from design to quality and delivery.
How quality gets checked during production
- First part check: the first parts of every shift are compared with the golden sample.
- Patrol checks: an inspector pulls parts every hour or two.
- Final inspection: a random sample from the finished goods is checked before packing is sealed.
- Your own inspection: many buyers book a third-party check before shipping.
Agree on shipping terms early. FOB means you arrange shipping from the Chinese port. DDP means the supplier delivers to your door with duties paid. For the first order, many buyers fly a small batch and send the rest by sea.
After shipping, the mold stays at the factory, ready for your next order. You own it. Reorders skip Steps 1 to 8 and take only a few weeks. Ask the factory how they store and maintain your mold between orders.
One date catches almost everyone: Chinese New Year. Most factories close for 2 to 4 weeks in late January or February. Plan orders around it.
How long does the whole project take?
Most projects take 4 to 8 months from idea to parts delivered by sea. A simple part with ready 3D files can arrive in about 3 months. Complex parts with several design rounds take longer. Pick your situation and see a realistic range.
How long will my project take?
Pick your situation. The chart updates with a realistic range for a China-made mold and parts.
Ranges come from typical projects. Factory holidays, design changes, and slow approvals add time. Your own review speed matters more than most buyers expect.
The mold build is always the longest block. But the time you can actually save is elsewhere. Fast answers on DFM reports and samples often save more time than any rush fee.
Where your money goes
Here’s a typical budget for a small to mid-size part made in China. Use it to sanity-check quotes, not as a price list.
| Step | What you pay for | Typical range | When you pay |
|---|---|---|---|
| 1. Define | Nothing | $0 | – |
| 2. 3D design | Product design or 3D scanning | $0–$3,000 | Per project |
| 3. Design check | DFM review | Usually free with a mold order | – |
| 4. Prototype | 3D printing, CNC, or casting | $30–$1,500 | Before production |
| 5–7. Mold | Mold design, steel, machining, samples | $3,000–$10,000 simple; $10,000–$50,000+ large or complex | Deposit at order, balance at sample approval |
| 8. Pilot run | A small first batch | Part price × quantity | Before production |
| 9. Production | Parts, packing, inspection, freight | Part price × quantity + extras | Deposit, then balance before shipping |
For a deeper look at what drives mold and part prices, see our complete injection molding guide.
The five checkpoints you sign
Keep a record of each approval. Emails with attached files and a clear “approved” are enough. If a dispute ever happens, these five records settle it.
| Checkpoint | You approve | Keep on file |
|---|---|---|
| 1. Brief agreed | What the part must do, quantity, target price | The signed brief |
| 2. Design freeze | The final 3D design | The STEP file and 2D drawing, with version number |
| 3. Mold design approved | Mold layout, gate spots, split lines | The mold drawing and quote |
| 4. Golden sample approved | The sample that sets the standard | The signed sample and size report |
| 5. Production release | Pilot batch quality and packing | Inspection report and packing spec |
Mistakes first-time buyers make
- Keeping the budget secret. Engineers then guess, and guesses are usually wrong.
- Skipping the prototype. Two weeks saved can turn into two months of mold rework.
- Changing the design after the freeze. Every change after steel is cut costs time and money.
- Choosing the cheapest mold quote. Soft steel and poor cooling show up as slow, costly production.
- Approving samples by photo. Hold them, fit them, test them.
- Not owning the mold in writing. Put mold ownership in the contract.
- Forgetting factory holidays. Chinese New Year can quietly eat a month.
Developing a plastic part isn’t mysterious. It’s nine steps and five signatures. Get the brief right, test before you pay for steel, freeze the design, and approve samples with care. Do those four things and most surprises disappear.
Have an idea, a sketch, or a sample?
Send us what you have. We’ll tell you which step you’re at, what comes next, and what it will roughly cost. Free, with no obligation.
Frequently asked questions
How long does it take to develop a new plastic part?
Most projects take 4 to 8 months from idea to parts delivered by sea. Mold making alone takes 4 to 10 weeks. Ready 3D files, quick approvals, and air freight shorten it.
How much does an injection mold cost?
A simple small mold made in China often costs $3,000 to $10,000. Large or complex molds can pass $50,000. Size, moving parts, cavities, and steel grade drive the price.
Do I own the mold after I pay for it?
Yes, you should. Put mold ownership in writing before paying the deposit. The mold usually stays at the factory for reorders, but it remains your property.
Can I skip the prototype to save time?
You can, but it’s risky. A prototype costs a few hundred dollars. Finding a fit problem after steel is cut can cost thousands and add weeks.
What happens if the first samples aren’t right?
That’s normal. The factory adjusts the mold and sends new samples, usually within one to three rounds. Fixes are free if the part doesn’t match the approved design.
What do I need to send to get a quote?
Ideally, 3D files in STEP format, the plastic, and your yearly quantity. If you only have a sketch or sample, send it anyway. A factory can quote design work first.
Can I start with a small quantity?
Yes. For a few hundred parts, silicone casting or a quick aluminum mold often makes more sense. Move to a steel mold once sales prove the demand.

