How We Manage Injection Mold Projects From DFM to Shipment in 9 controlled steps that protect timeline, budget, and part quality.
Sourcing a tool overseas should not feel like a gamble. Yet for many US buyers, the gap between a quote and a finished mold is a black box. This article opens that box. It explains, step by step, How We Manage Injection Mold Projects From DFM to Shipment at Topworks Plastic Mold, so you can see exactly where your money goes, where risk lives, and where good project control protects your launch date. You will learn what happens during DFM, how mold flow and deflection analysis prevent defects, how trials and inspection work, and what you should verify before you approve tooling.
The goal is simple. By the end, you should be able to evaluate any mold maker, not just us, with sharper questions and clearer expectations.
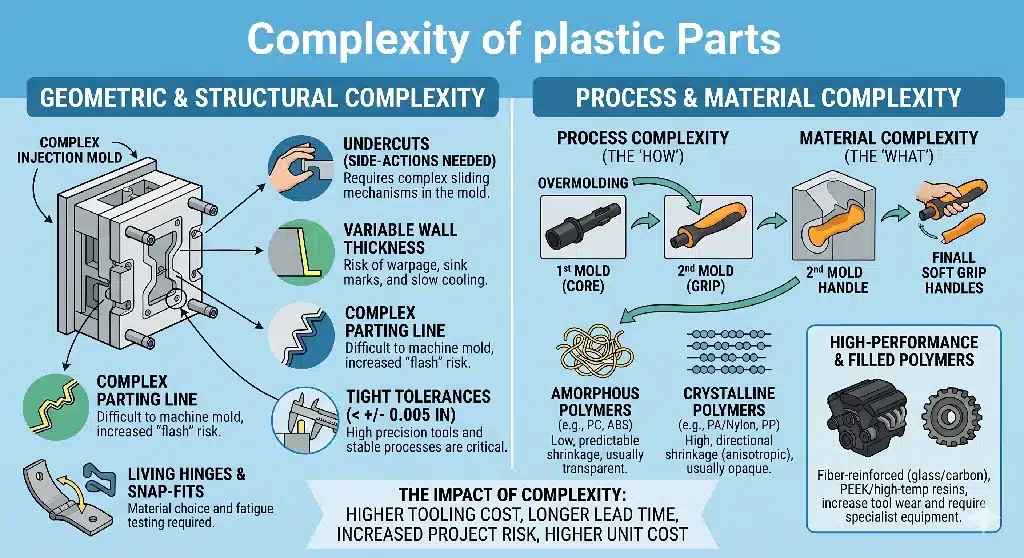
Injection Molding DFM Explorer
Twelve adjustable design elements that determine whether a molded part builds cleanly, cycles fast, and looks right. Click any tab to compare good vs. bad practice.
Draft Angles
Taper on vertical walls so the part releases from the steel
Every surface parallel to the direction of mold pull needs a slight outward taper. Without it, the part wedges against the steel and refuses to eject cleanly — you get scratches, stress whitening, or fractured walls. Draft also extends mold life by reducing scraping load on polished surfaces.
Designer rules of thumb
- Minimum 0.5° on smooth surfaces; 1–2° is industry standard
- Add 1° per 0.025 mm of texture depth
- Heavy leather or shark-skin textures may need 5°+
- Only surfaces perpendicular to mold opening need draft
- More draft is almost always better if the envelope allows
Corner Radii & Fillets
Round every inside corner to relieve stress and guide flow
Sharp internal corners are the fastest route to part failure. Stress concentrates at the apex during cooling and again under load, initiating cracks. They also choke flow and create cooling differentials. Outside corners matter too — a small round prevents steel chipping and flash-prone feather edges.
Designer rules of thumb
- Inside radius ≥ 0.5 × wall thickness (minimum); 0.75× is better
- Outside radius = inside radius + wall thickness (keeps wall uniform)
- Never design a true 0° corner on any feature that matters
- Fillet the base of every rib to prevent sink and boost stiffness
Ribs
Stiffen parts without thickening walls
Ribs add rigidity without bulking up the main wall — critical because thick walls sink, warp, and lengthen cycle time. But ribs have their own rules. Too thick and they sink themselves; too tall and they won't fill or they buckle; too close together and the steel between them can't cool.
Designer rules of thumb
- Rib thickness: 0.5–0.6 × adjoining wall thickness
- Rib height: ≤ 3 × nominal wall thickness
- Rib-to-rib spacing: ≥ 2 × wall thickness
- Base fillet: 0.25–0.4 × wall thickness
- Side draft: minimum 0.5° per side, 1° preferred
Bosses
Mounting features for screws, pins, and inserts
A boss is any projecting cylinder used for fastening or alignment. The common mistake is modeling it as a solid lump, which creates a thick section that sinks, warps, and cools slowly. Design a boss as a tube whose wall matches the rest of the part, supported by gussets where it joins the main wall.
Designer rules of thumb
- Outer diameter ≈ 2 × screw diameter (self-tapping)
- Boss wall ≤ 0.6 × nominal wall to avoid sink
- Use 3–4 gusset ribs at the base for load transfer
- Draft: 0.5° external, 0.25° internal
- Never leave a boss free-standing — tie it to a wall or floor
Undercuts
Features that block straight ejection
An undercut is anything that mechanically locks the part to one half of the mold — a snap feature, a side hole, an external groove. Resolving them requires side actions, lifters, or collapsible cores, which dramatically raise tooling cost and cycle time. The first question in DFM review: can this undercut be eliminated?
Designer rules of thumb
- Redesign snap fits as through-holes where possible (pass-through coring)
- Move side holes to parting-line direction if geometry allows
- Accept a 2–3° ramp instead of a true 90° undercut (flex-release)
- If side action is unavoidable, minimize travel distance
- Hand-loaded inserts can solve rare undercuts cheaply at low volume
Gate Location & Type
Where molten plastic enters the cavity
The gate controls flow direction, pressure distribution, weld-line location, and how visible the gate vestige will be. Get it wrong and you see sink, voids, jetting, or knit lines straight across the cosmetic face. Get it right and the part fills uniformly with the scar hidden.
Designer rules of thumb
- Gate into the thickest section first — flow goes thick to thin
- Place gate to minimize flow length and balance pressure
- Avoid gating onto thin ribs, bosses, or unsupported walls (jetting)
- Edge gate: simplest and cheapest; small vestige remains
- Tunnel / submarine gate: auto-trims at ejection, cleaner cosmetics
- Hot-tip gate: zero runner waste, ideal for high volume
Parting Line
Where the two mold halves meet — and always show
The parting line is where the two mold halves come together, and it will almost always show as a faint seam or flash on the finished part. Every part has one — the question is where you put it. A bad parting line runs across a polished A-surface; a good one disappears into an edge, a radius, or a recessed feature.
Designer rules of thumb
- Route the parting line along a natural edge, step, or rim
- Avoid parting lines that cross cosmetic A-surfaces
- Keep the line in a single plane when possible (cheaper mold)
- Stepped or profiled parting lines cost more but hide the seam
- Consider whether flash will be trimmed or accepted as-is
Ejector Pin Placement
Where the part gets pushed out of the mold
Ejector pins leave small circular witness marks — raised or depressed — on the surface they contact. Place them on cosmetic faces and every part ships with blemishes. Place them on the B-side and you never see them. Pin size and count also matter: too few or too small and you deform thin walls or leave drag marks.
Designer rules of thumb
- Always eject against the B-side (non-cosmetic) surface
- Put pins on ribs, bosses, and flat non-visible flanges
- Minimum 3 pins for a typical part; more for larger or flexible ones
- Larger-diameter pins distribute load better than many small pins
- Mark "no-eject zones" on your print for cosmetic areas
Coring
Hollow out thick sections to keep walls uniform
Thick sections are the enemy of injection molding. They cool slowly, creating sink marks outside and voids inside as the skin solidifies before the core. The fix is counterintuitive: carve the thickness out from the back, turning a solid block into a shell with uniform walls. The part keeps its envelope shape but molds cleanly and cycles faster.
Designer rules of thumb
- Any section thicker than 1.2× nominal wall is a candidate to core
- Core from the side hidden in the assembly
- Replace solid handles, bases, and pads with ribbed shells
- Uniform wall = uniform cooling = minimum warpage
- Cycle time drops dramatically when thick sections disappear
Hole Design
Through-holes vs blind holes and core-pin limits
Every hole in an injection-molded part is formed by a steel pin in the mold called a core pin. Long, thin core pins are cantilevers — they deflect under flow pressure and drift out of position. That's why blind holes have strict aspect ratios and why through-holes (supported on both ends) are always preferred when geometry permits.
Designer rules of thumb
- Through-hole depth up to 6× diameter (supported both ends)
- Blind-hole depth ≤ 3× diameter (unsupported pin)
- Minimum distance from hole edge to part edge: 1 × wall thickness
- Chamfer or radius the hole opening to ease flow around the core
- Hole diameter ≥ 1.5 mm for reliable pin strength
Text & Logos
Part numbers, warnings, and branding molded into steel
Text on a molded part is inverted into the mold steel. If letters stand proud on your part, they're engraved into the mold — a single durable cavity. If letters are recessed into your part, they're raised on the mold — thin fragile steel that chips off. That's why raised text is the industry default.
Designer rules of thumb
- Raised text on the part (engraved in the mold) — preferred
- Letter height: 0.4 – 0.8 mm above the surface
- Line width: ≥ 0.25 mm; stroke ≥ 2× smallest EDM feature
- Sans-serif molds better than serif — serifs snap off
- Align text with draft direction; add 10–15° side draft on letters
- Avoid fonts under 2 mm cap height on textured surfaces
Surface Texture
SPI finishes and their draft-angle demands
Textured surfaces look premium and hide minor defects, but every texture cuts into the mold steel — and the part has to climb over that texture during ejection. Without enough draft, the texture drags the part like sandpaper. Texture depth and draft angle are tightly coupled; you cannot specify one without considering the other.
Designer rules of thumb
- Add 1° of draft per 0.025 mm (0.001″) of texture depth
- Light grain (SPI B-1, B-2): 1–2° draft minimum
- Medium grain (SPI C-1, C-2): 3–4° draft
- Heavy leather or stone texture: 5–7° draft
- MoldTech and VDI are common alternatives to SPI grades
- Lock texture spec with your molder BEFORE finalizing geometry
What Does It Take to Manage an Injection Mold Project Well?
Strong project management causes predictable outcomes. A mold is a long-lead capital asset, often built thousands of miles from your desk, so small misunderstandings early can become expensive scrap later.
Good management of an injection mold project includes four things working together:
- Engineering discipline — catching design problems before steel is cut
- Process transparency — knowing the build stage at any moment
- Quality gates — formal checkpoints that must pass before work continues
- Clear communication — one accountable point of contact across time zones
When these four elements are missing, buyers feel it as missed dates, surprise costs, and parts that fail at the worst possible time. When they are present, the project moves quietly and on schedule.
How We Manage Injection Mold Projects From DFM to Shipment
How We Manage Injection Mold Projects From DFM to Shipment follows nine controlled steps, each with a checkpoint that must close before the next begins. Topworks has run this workflow as an ISO 9001 certified, factory-direct manufacturer since 2006. There is no trading company between you and the shop floor, which means decisions reach engineers without translation loss.
Here is the full sequence.
Step 1 — Project Intake and Feasibility Review
Every project starts with a feasibility review, not a price. When you send a 3D file (STEP, IGES, or native), we confirm the part can be molded, the wall thickness is sound, and the resin choice fits the application. We flag anything that looks risky before quoting. This step prevents the classic problem of pricing a part that cannot actually be made as drawn.
Step 2 — Free DFM Analysis
We perform a free DFM analysis on every part. DFM, or Design for Manufacturability, examines the part through the lens of how it will be tooled and molded. We check draft angles, undercuts, gate locations, ejection, parting lines, and sink risk. You receive a written DFM report with annotated images and specific recommendations. Nothing moves to design until you sign off on the DFM outcome.
Step 3 — Mold Flow and Deflection Simulation
For complex or tight-tolerance parts, we run mold flow simulation and deflection analysis. Mold flow predicts how molten plastic fills the cavity, where it knits, and where it may trap air or burn. Deflection analysis is just as important: it predicts how the core, cavity, and mold plates may bend under injection and clamping pressure. Uncontrolled deflection causes flash, dimensional drift, and uneven wall sections. By modeling it first, we size the steel and support pillars to keep deflection within safe limits.
Step 4 — Mold Design and Customer Approval
Our tooling engineers then produce the full 2D and 3D mold design. This covers cavity layout, runner and gate system, cooling channels, ejection, and the mold base specification. We send the design package for your approval and hold a design review if needed. Approval here is a hard gate. We do not order steel until you confirm the design.
Step 5 — Steel Selection and Procurement
Steel selection matches the resin, the cycle count, and your budget. A short-run prototype tool in P20 or pre-hardened steel costs less and builds faster. A high-volume production tool in hardened H13 or 718H lasts far longer and resists wear from glass-filled resins. We recommend the grade, you approve it, and procurement begins with traceable material certificates.
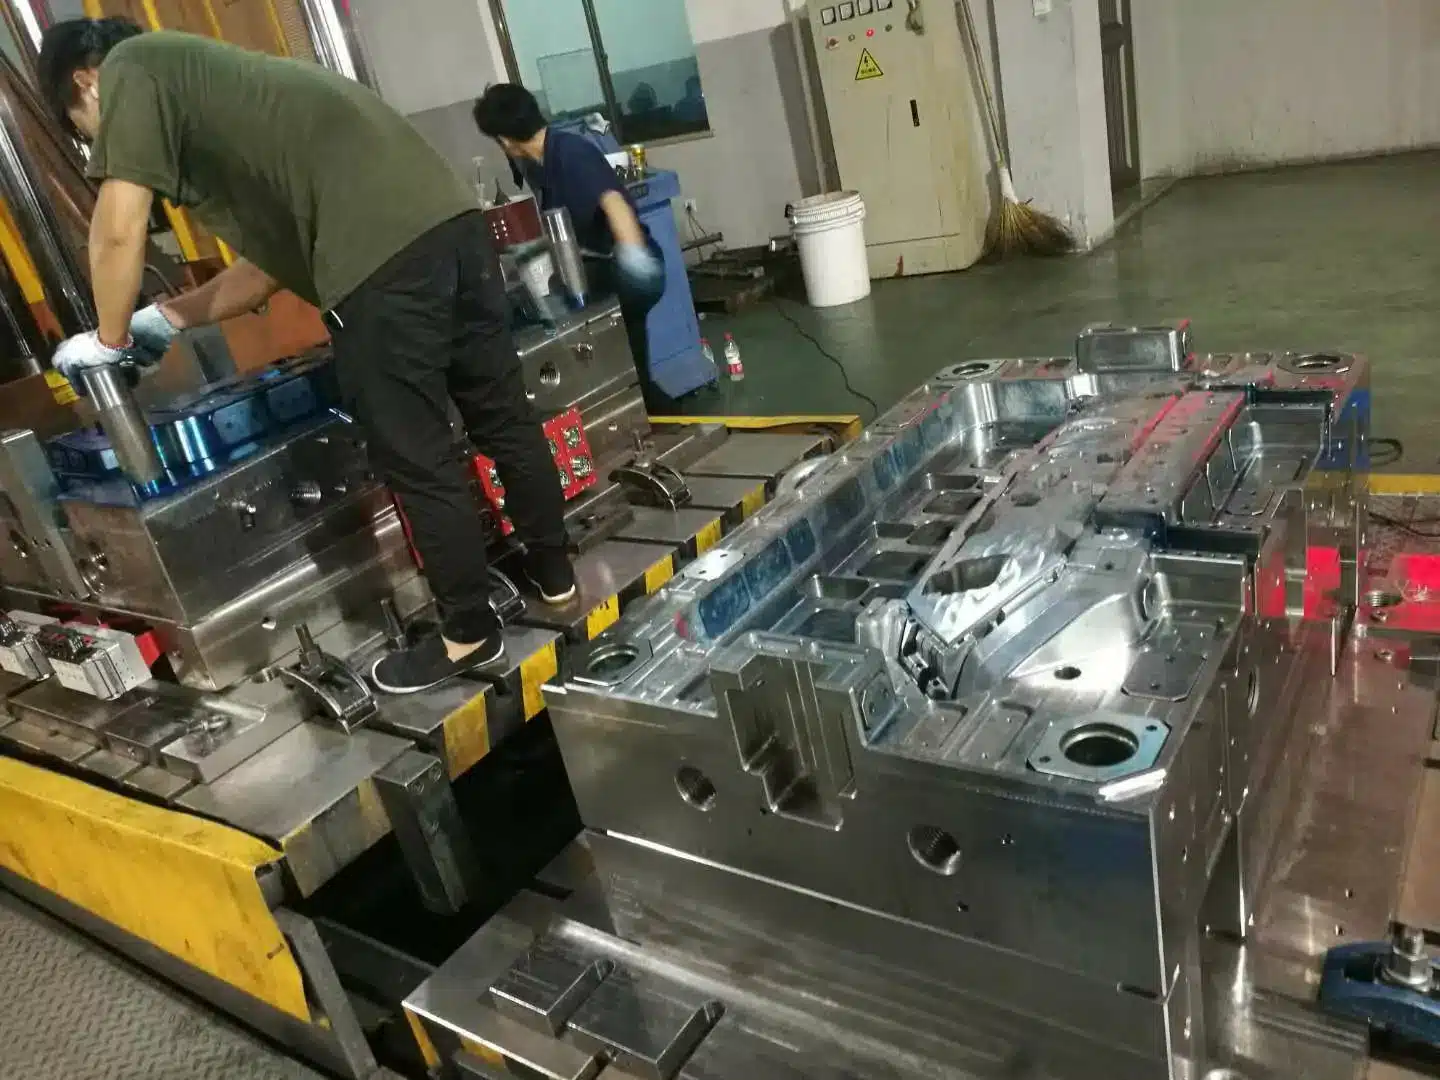
Step 6 — Machining, EDM, and Mold Assembly
Now the mold is built. CNC milling, turning, EDM, wire cutting, and grinding bring the cavities and cores to final geometry. Skilled mold makers then fit, polish, and assemble the components. Throughout this phase you receive scheduled progress updates with photos, so the build never goes dark.
Step 7 — T1 Trial and First Article Samples
The first trial, called T1, is where steel meets plastic. We mold the first samples on the correct tonnage press using your specified resin. T1 reveals real-world behavior that simulation cannot fully guarantee. We capture process data, short shots, and any visual defects, then ship T1 samples to you for hands-on evaluation.
Step 8 — Inspection, Measurement, and Iteration
We measure first article samples against your drawing and issue a dimensional report. Where features are out of tolerance, we adjust the tool and run T2, then T3 if required. Each iteration is documented. This loop continues until parts meet your specification and you approve them in writing. Sample approval is the gate that releases the tool for production or shipment.
Step 9 — Packaging, Documentation, and Shipment
Finally, we prepare the mold and any approved parts for export. Tooling is cleaned, rust-protected, and crated to survive ocean freight. You receive the full documentation set: mold drawings, steel certificates, the trial report, the measurement report, and recommended maintenance intervals. We then arrange or coordinate shipment to your facility.
The table below summarizes the nine steps and what closes each one.
| Step | Stage | Gate to Pass |
|---|---|---|
| 1 | Intake & feasibility | Part confirmed moldable |
| 2 | Free DFM analysis | Buyer signs off DFM report |
| 3 | Flow & deflection simulation | Risks modeled and accepted |
| 4 | Mold design | Buyer approves design package |
| 5 | Steel selection | Grade approved, certs in hand |
| 6 | Machining & assembly | Build complete, photos shared |
| 7 | T1 trial | Samples molded and shipped |
| 8 | Inspection & iteration | Dimensions approved in writing |
| 9 | Packaging & shipment | Docs delivered, tool crated |
What Is DFM and Why Does It Come First?
DFM comes first because it prevents the most expensive mistakes. Design for Manufacturability reviews a part before any steel is cut, when changes cost almost nothing.
A DFM review improves a project in concrete ways:
- It identifies insufficient draft that would cause drag marks or ejection failure.
- It relocates gates to reduce visible blemishes and weld lines.
- It corrects uneven wall thickness that causes sink and warpage.
- It flags undercuts that may need side actions or lifters, which affect cost.
Skipping DFM does not save time. It moves the discovery of problems from the design stage to the trial stage, where fixing them means re-cutting hardened steel. For US buyers managing a product launch, that shift can mean weeks of delay. DFM front-loads the thinking so the back end stays calm.
How Does Mold Deflection Affect Part Quality?
Mold deflection directly degrades part quality and tool life. Injection happens under enormous pressure, and steel, though stiff, is not perfectly rigid. Cores and cavity walls can bend slightly, and mold plates can flex if they lack support.
The consequences of uncontrolled deflection include:
- Flash — plastic escaping where plates separate under pressure
- Dimensional variation — features drifting outside tolerance shot to shot
- Core shift — a thin core bending sideways, causing uneven wall thickness
- Premature wear — repeated flexing fatiguing the steel over time
We control deflection by analyzing it during simulation, then adding support pillars, increasing plate thickness, or selecting stiffer steel where the model shows risk. Managing deflection early is far cheaper than chasing flash and tolerance problems during trials. For demanding parts, deflection analysis is one of the highest-value steps in the entire workflow.
How Long Does an Injection Mold Project Take?
Lead time depends on complexity, but most molds follow a predictable range. A simple single-cavity tool may take a few weeks, while a complex multi-cavity production mold with side actions takes longer. The honest answer is that timelines vary by source and should be verified for your specific part.
What matters more than a single number is schedule control. Because each of our nine steps has a gate, delays are visible early rather than discovered at the end. Typical drivers of lead time include cavity count, surface finish requirements, the number of slides or lifters, and how quickly design and sample approvals come back from your side. Fast buyer approvals shorten the project; slow approvals extend it.
How Do We Control Quality Across the Project?
Quality control runs through every stage, not just final inspection. As an ISO 9001 certified shop, we treat quality as a process, not an inspection at the end.
Our quality system includes:
- Material certificates that trace steel and resin to their source
- In-process inspection during machining and assembly
- Documented T1, T2, and T3 trial records
- A dimensional measurement report against your drawing
- Written approval gates before any major step proceeds
This layered approach means a defect has many chances to be caught before it ever reaches your dock. It also gives you a paper trail, which matters for regulated industries and for any buyer who must justify a supplier decision internally.
Which Mold Type Fits Your Project?
Choosing the right tool type controls both cost and risk. The best choice depends on your annual volume, budget, and how final your design is. The comparison below helps you decide.
| Criteria | Prototype / Bridge Tool | Production Tool |
|---|---|---|
| Typical steel | Aluminum or P20 | Hardened H13 / 718H |
| Volume suited | Low, validation runs | Medium to high volume |
| Upfront cost | Lower | Higher |
| Lead time | Shorter | Longer |
| Tool life | Limited cycles | Long, durable |
| Best when | Design may still change | Design is locked |
A prototype tool improves speed to market when you still expect changes. A production tool lowers your long-term cost per part when volume is committed. Many US buyers start with a bridge tool, validate the design and market, then invest in a production tool once the design is frozen.
What Should US Buyers Verify Before Approving a Mold?
Smart verification before approval prevents costly regret. Before you sign off on a design or sample, confirm these points:
- The DFM report addresses every cosmetic and functional concern.
- The steel grade matches your expected production volume.
- The dimensional report covers all critical-to-function features.
- Gate location and witness marks are acceptable on visible surfaces.
- The cooling design supports a realistic cycle time.
- You have received material certificates and trial documentation.
Asking for these before approval is normal and welcomed by serious mold makers. A supplier who resists transparency is a supplier worth questioning. The strength of How We Manage Injection Mold Projects From DFM to Shipment lies precisely in making each of these points visible at the right gate.
Frequently Asked Questions
Do you charge for DFM analysis? No. Topworks provides free DFM analysis on every project before quoting moves forward. You receive a written report with annotated images and recommendations. This lets you evaluate manufacturability without upfront commitment.
What file formats do you accept for the part design? We accept STEP, IGES, and most native CAD formats, along with 2D drawings for tolerances and notes. The more complete your data, the more accurate the DFM and quote. If you only have a sketch or a sample part, we can still help scope the project.
Can I get samples before committing to production? Yes. Our workflow includes T1 trial samples shipped for your hands-on evaluation, followed by a dimensional measurement report. You approve parts in writing before the tool is released for production or shipment. This protects you from approving a tool you have not physically validated.
How do you handle design changes during the build? Changes are easiest and cheapest before steel is cut, which is why DFM and design approval are hard gates. If a change is needed later, we assess its impact on cost and schedule and document it before proceeding. Transparency about change cost is part of how we manage projects.
Do you ship the mold, the parts, or both? We can ship the tool, validated parts, or both, depending on your agreement. Tooling is cleaned, rust-protected, and crated for ocean freight. You also receive the full documentation set so the mold can be maintained or moved later.
What happens if parts are out of tolerance after the first trial? We measure samples against your drawing and adjust the tool, then run additional trials such as T2 or T3 as needed. Each iteration is documented until parts meet specification and you approve them. This corrective loop is included in the normal project flow, not treated as an afterthought.
Conclusion
Managing an injection mold project well is about control, not luck. How We Manage Injection Mold Projects From DFM to Shipment turns a long, distant build into a sequence of visible, gated steps: feasibility, free DFM, flow and deflection analysis, design approval, steel selection, machining, T1 trials, inspection, and documented shipment. Each gate protects your timeline, your budget, and your part quality.
For US buyers, the practical takeaway is to demand this kind of transparency from any supplier. Ask about DFM. Ask how deflection is controlled. Ask for trial and measurement documentation before approval. When a mold maker can answer clearly at every stage, you are no longer gambling on a black box. You are managing a known process toward a predictable result.

