Understanding Injection Molding: Key Terms for Small Business Owners
Injection molding is likely the first thing that comes to mind when you think about being a small business owner and how you can put a sketch on the desk or 3D-printed prototype onto an actual product that can be made. It is the most effective method to produce high quality plastic components when quantities are high such as phone cases, clips, caps, housings, hinges and others.
What’s the catch? The words. Oppositely, it may appear that every one of them speaks a cipher when it comes to discussing tooling, gates, tonnage, draft, and so forth. This is a guide to the 10 terms most significant to injection molding that you will come to hear as soon as you begin to talk with molders and design partners. At the end, you will be in a position to pose questions more effectively and prevent making costly mistakes and read quotes without any difficulties.
1) Tooling
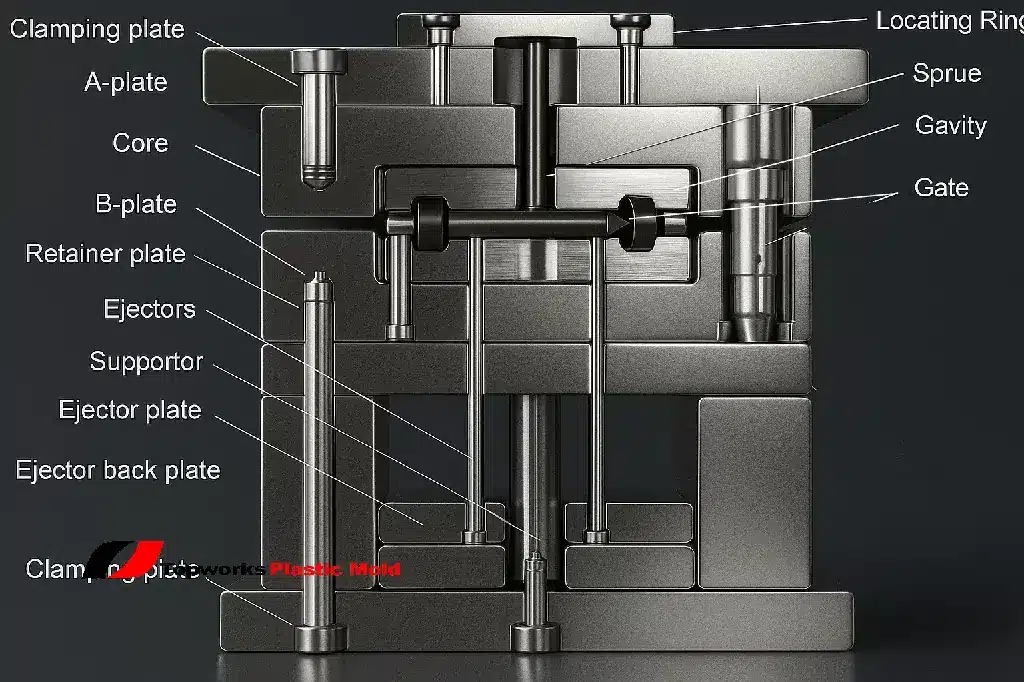
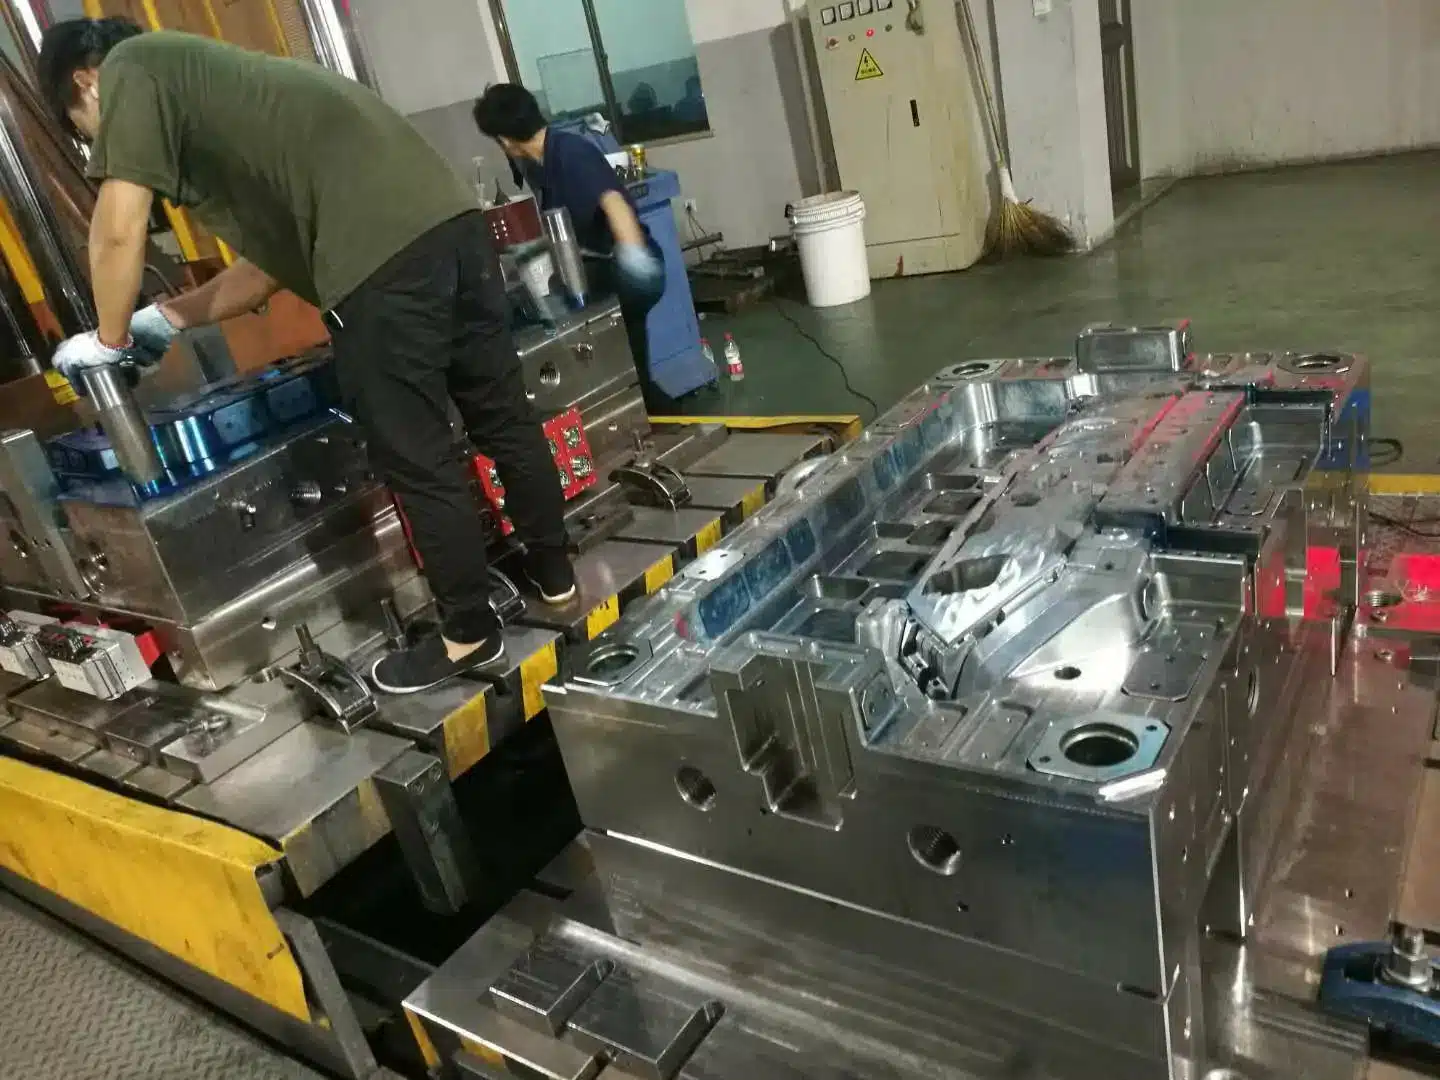
What it means: The mold is the negative of your part ,which is made of steel or aluminum. It is a block composed of a number of pieces with channels, cavities, and mechanisms within them that mold the molten plastic to the shape that you desire. The terms mold and tool are used interchangeably by people.
Why it matters: The most costly item you spend initially is the mold. Its quality influences the surface finish, the precision of the dimensions, the life span and the time per cycle (speed of making parts).
What you should ask a vendor:
- Material: Aluminum (smaller and medium volume volumes are faster and cheaper) or hardened steel (more costly but longer lasting)?
- What is your estimate of the number of shots (parts) that it will take you to maintain or rework?
- Lead Time: It may take weeks to get aluminium tools and even longer with steel tools.
- Whose is the mold, yours or the molder’s? Can you move it if you need to?
Errors of inexperienced authors: Excessive information on the mold early production. A prototype mold is an aluminum version of a tool, commonly referred to as a soft tool or bridge tool, and can help you save money, and learn more quickly, when you are either a market-validating tool or an iterating tool.
2) Resin
What it means: You will shape plastic, such as ABS, PP, PC, Nylon (PA), POM, TPE, etc. Each resin possesses its strength, hardness, capacity to withstand chemicals and heat as well as cosmetic characteristics.
Why it matters: The kind of resin that you use influences performance, mold temperature, cycle time and the cost of every part. Subsequently altering the resins could necessitate alterations in design (wall thickness and draft), and even new equipment.
What to ask a seller:
- What type of resin would you suggest that I use? (e.g. outside UV exposure, Impact resistance and food contact)
- Should we require glass fiber to make it tough, UV stabilizers to keep off the sun and flame retardants to satisfy the safety requirements?
- Arrange colour: add colours (masterbatch – colour concentrate) at the press with pre-coloured pellets.
Errors of inexperienced authors: Selecting a liked resin in a 3D print (which is typically not injection grade) or believing that the strongest one is the better one. Unbreakable may also describe something brittle. The right resin will be that which is best in your situation.
3) The Melt Flow Index (MFI)
What it means: MFI is the measure of the ease with which a melted plastic passes through a hole in normal conditions. Overall, the greater the number, the easier the resin will flow, and, therefore, it will be easier to fill thick walls or long flow routes.
Why it matters: The quality of the fill-out of the mold with no defects is important to determine your geometry limits, position of the gate, and cycle time. Bad flow implies either lack of fillings (too short) or excessive pressure and wear.
What to say to a vendor:
- Is the grade of MFI that we selected correct based on the thickness of our walls and the size of the part?
- Should we go with a high grade of the same resin family by MFI to have thinner walls?
Mistakes beginners make: Confusion of MFI with overall performance. Grades that have a high flow can be easily filled, however, they can lose impact strength or other properties. You want to get locked in; consult your molder.
4) Angle of Draft
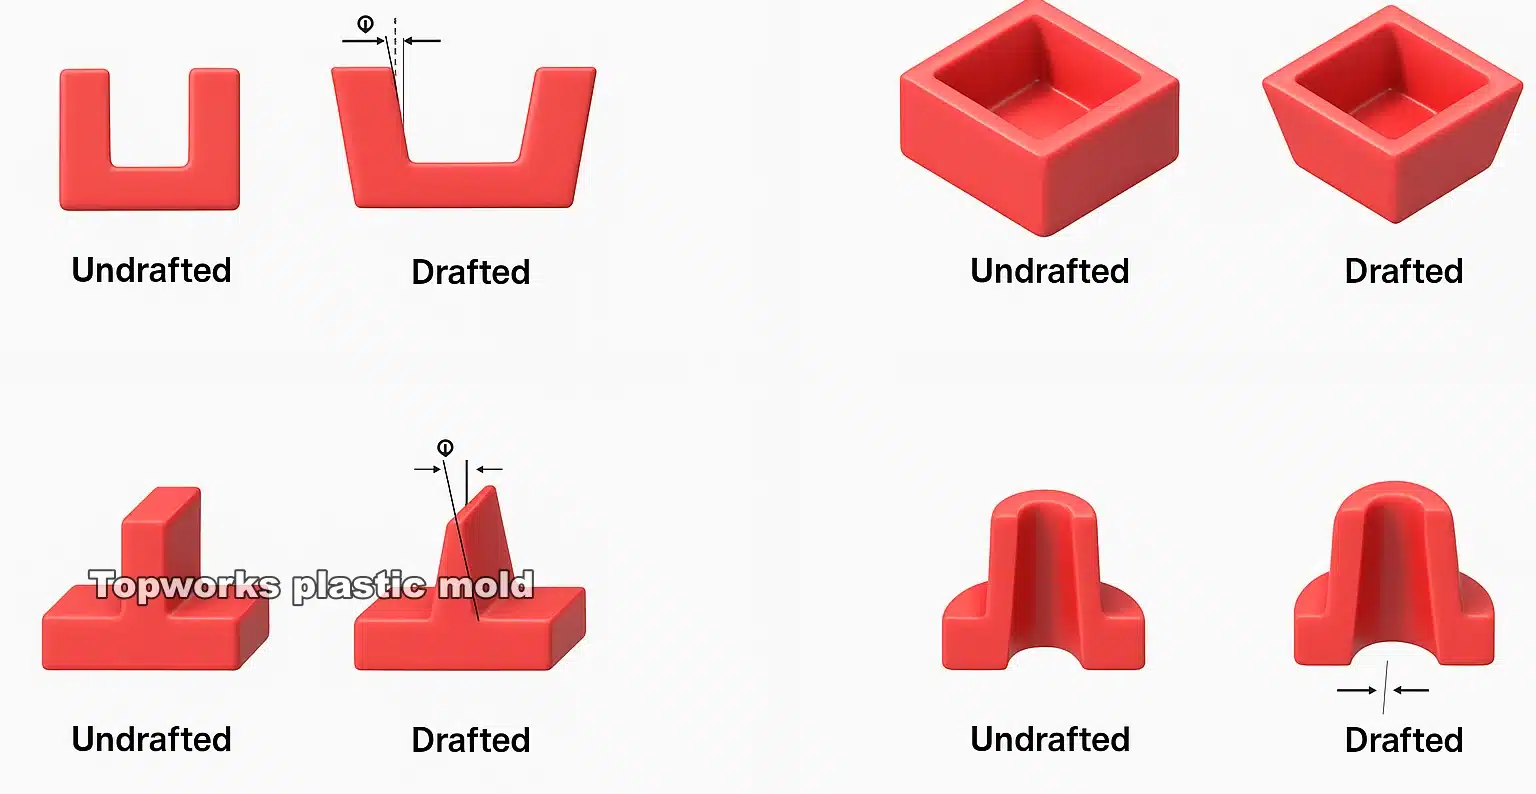
What it means: Draft is the minor angle on vertical areas that cause your part to be easier to extrude out of the mold. At least 1-2 degrees draft is required in most parts, although more is usually needed, such as 3-5 degrees on a textured surface.
Why this is important: Inadequate draft may lead to scuffing of the parts, sticking to the vacuum or not coming out. It implies an increase in scrap, a longer cycle and costly tool modification.
What to say to a vendor:
- What draft do you consider would be most suitable to our finish? (Glossy, matte, rough texture)
- Should we bolster sections that do not require to be appealing to make the launching better?
Errors of inexperienced authors: Creating walls that are absolutely straight. It looks neat in CAD. It does cause headaches indeed. One of the most significant and least expensive design decisions is to add draft early.
5) The parting Line
What it means: The line at which the two halves of the mold are joined is the parting line. One on each of the molded parts; it is a little seam round the edge.
Why it matters: The location of the parting lines influences cosmetics (appearance of the visible seam), functionality (fit of the parts with each other), and ease of manufacturing (opening of the mold and undercuts location).
What to say to a vendor:
- Easily will I see the parting line? What will it be?
- Can it be concealed somewhere at the bottom of one side or on the side which does not have to appear attractive?
- How much do you have of flash tolerance? (Flash is the additional thin plastic which may be involved in parting line.)
Errors of inexperienced authors: Failure to listen to the parting line until T1 (first shots). Choose early what you are not mindful of looking at and in case possible, make that section of your product language.
6) Gate
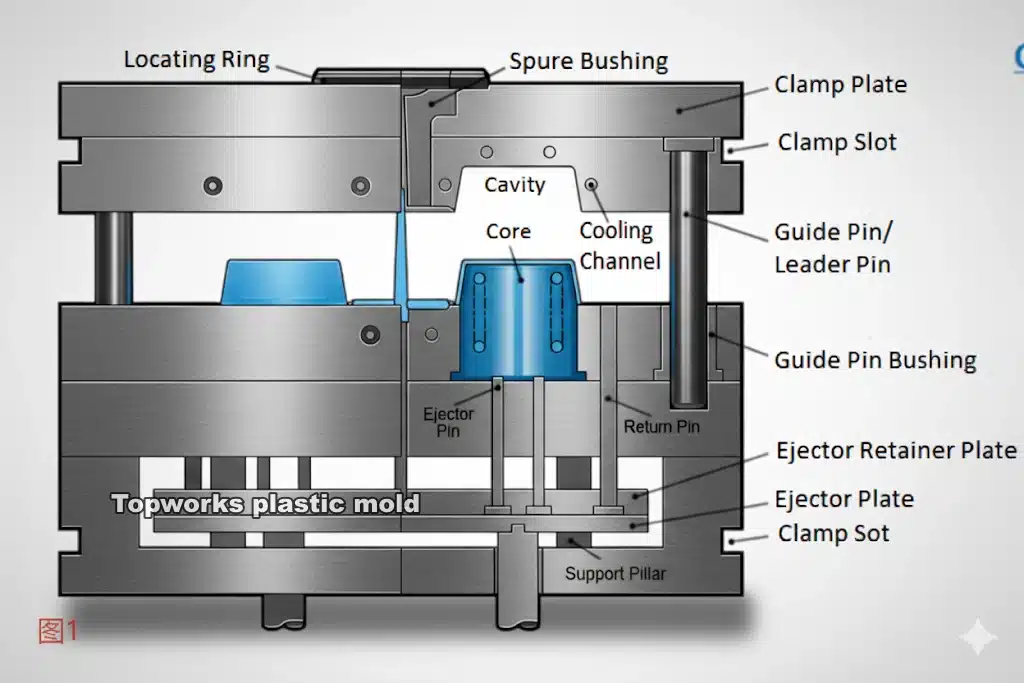
What it means: The hole that allows the melted plastic to enter into the part cavity is known as the gate. Common ones include edge gate, sub-gate, pin gate, tunnel gate and fan gate.
Why it’s important: The flow is influenced by the type and the position of the gate, the knit lines (where the fronts of the flow intersect), the sink marks and the post-processing (do you have to trim a gate vest?). The gate will frequently create a little depression at the outside.
What to ask a seller:
- Which type of gate is for resin and geometry?
- Where are you going to find the gate vest?
- Is the location of the gate going to result in knit lines over significant features, such as snap-fits or logos?
Errors of inexperienced authors: Forgottenness about the place where you place the gate can create or destroy the appearance. When you must have the front of what you are making to be flawless, either place the gate on a surface that is not visible or find a design of the gate that does not leave so many marks.
7) Cold vs. Hot runner
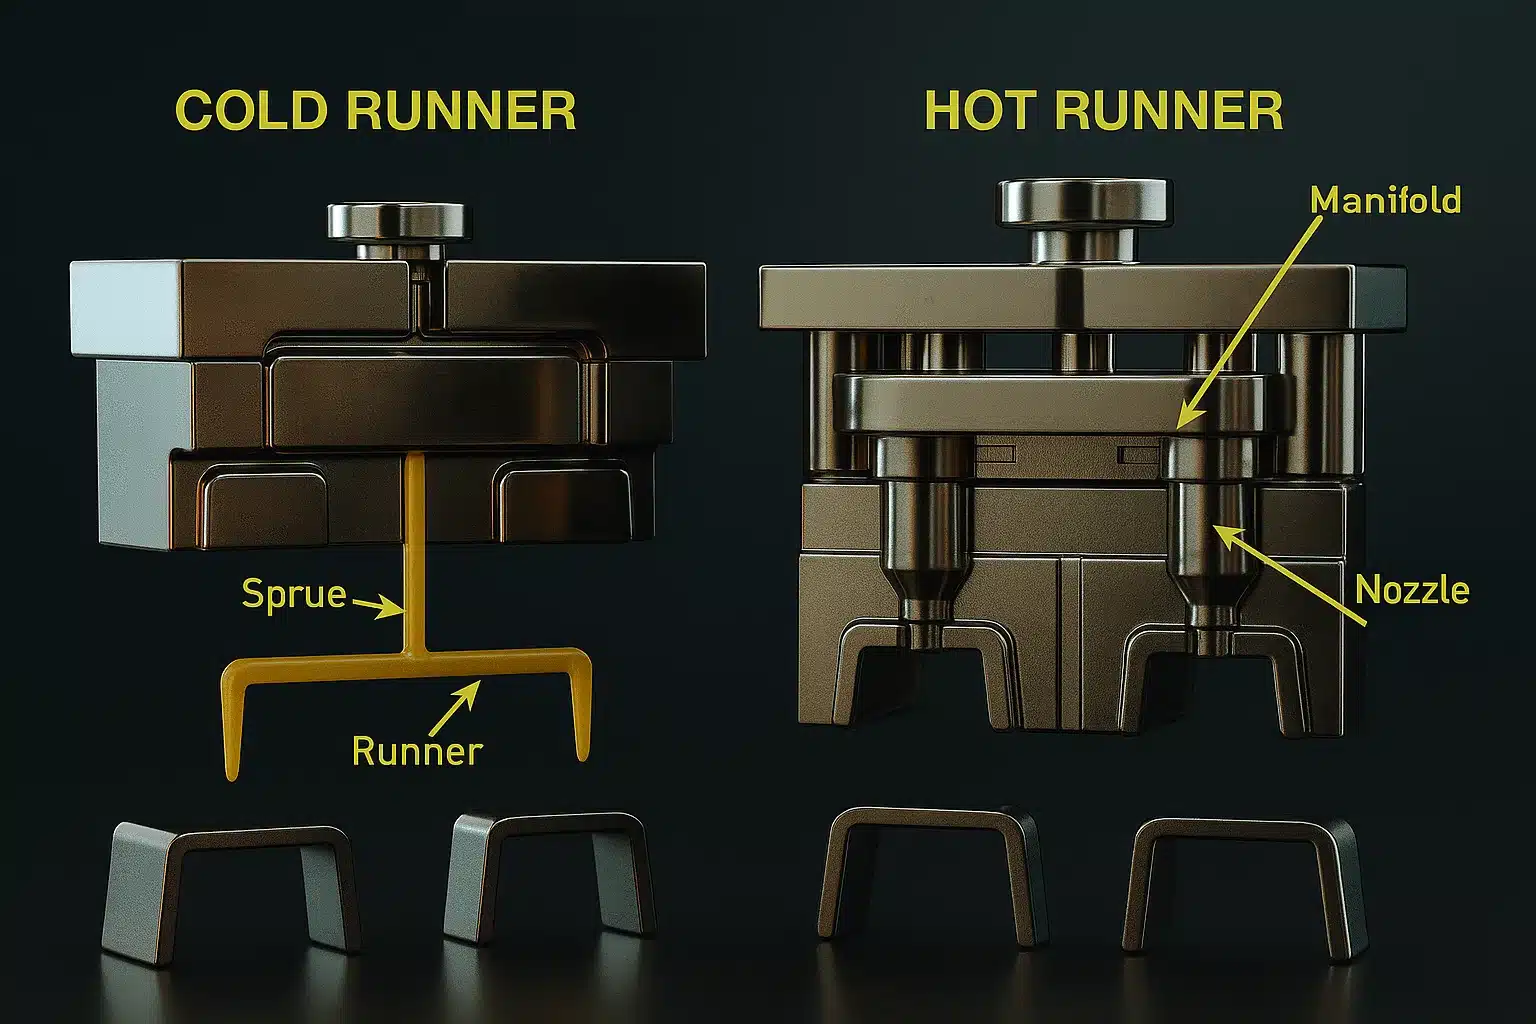
What it means: The principal route of the machine is the sprue that links the machine nozzle with the mold. These smaller channels which pump the molten resin to the gate of each cavity are known as runners. Two systems are available, cold runner, when the material is cooled in the runners and disposed of as scrap or regrind, and hot runner, when the channels are heated to retain the plastic in the molten state and reduce wastage.
Why it matters: The number of wastes, the cycle time, the pressure, and the fill balance between the cavities depend on the design of the runner. Hot runners would be able to enhance cosmetics and reduce material waste, but introduce an extra cost and complexity of tooling.
What to say to a vendor:
- For current project, what would be the best solution,:cold or hot?
- And what is the regrinding policy in case it is a cold runner? (How many parts of sprue or runner material can be reused into new parts after regrinding?)
- How often is the maintenance and downtime going to be of a hot runner?
Mistakes for beginners: Bearing in mind that hot runners are superior. They are effective at high volumes, and a well-designed cold runner may be more cost effective where the validation runs are low volumes.
8) Ejector System
What it means: Once the plastic is cooled, the mold opens and the ejector pins spray the part off the core. Parts that would otherwise trap the part are parts that are allowed to pass by lifters and slides.
Why it matters: It may be ejected (marked by small circles) where the pins are in contact with the part. When the ejection is not good it may cause scratches or shape alteration of the part. Tools that contain slides and lifters complicate them and therefore, they need to be utilized when required.
What to ask a seller:
- Where will the ejector pins be? Are they going to be concealed or apparent?
- Do we have any undercuts which require any slides or lifters? Suppose we can do so, can we design so as to eliminate them?
- What is the force of ejection, and is our draft such as to favour a smooth departure?
Mistakes beginners make: Making fancy undercuts in order not to need to assemble things without consideration of the impact the tools will have on them. Two simpler parts which are attached to each other are cheaper than one complex part that contains slides in certain cases.
9) Cycle time
What it means: The time period required by one molding process to complete the cycle, including the stage of closing the mold, injecting the mold, holding the mold, cooling the mold, opening the mold and ejection of the material is the cycle time. It is one of the major aspects of the cost per part.
Why it matters: Fewer cycles imply that there are an increased number of parts per hour and therefore reduced unit cost. However, when you cool or eject too fast you might have warping, sinking or cosmetic issues.
What to say to a vendor:
- What do we believe our cycle time will be, and what are the major items that will slow down the cycle (cooling, part thickness, resin crystallization)?
- Is it possible to shorten the cycles by making them thinner or putting cooling features into them?
- What does cosmetic finish we desirable influence cycle time?
Errors of inexperienced authors: Aging thick and solid products that require a long time to cool. Ribbing can be smartened to stiffen things, bosses can have their middle hollowed, the thickness of the walls in a part can be held constant, and cycle time can be reduced and quality can be enhanced.
10) Clamp force (Tonnage)
What it means: The pressure which the machine exerts on the mold to ensure that it remains closed during the injection is the clamping force. It is measured in tons. The absence of sufficient clamping force to hold the size of the shot and pressure of the injection may result in the mold flashing (plastic oozes out through the parting line).
Why it matters: How much tonnage you require is influenced by the size of your part, the area it will occupy and the resin that you are going to use. Tonnage influences the machines that can produce your part and consequently, impacts on the scheduling, cost, and availability.
What to ask a seller:
- What is the number of tons of resin and parts required?
- That will imply that only some presses will be capable of doing our job such as 300 tons and above?
- What is the relationship between increasing and decreasing the part size or adding cavities and tonnage?
Errors of inexperienced authors: Failure to consider the estimated size. Big, broad parts may require greater tonnage than the entire bulk of all the parts.
A First-Time Buyer Script
In asking quotes or in talking with a molder, use these words above as a clue:
- Get to tell them what you want and how many: “We want 2,000 pilot units within 6 months and 20,000 to 40,000 a year, provided the launch is successful.”
- Discuss the tooling strategy: “Was it possible to start with an aluminum single-cavity tool? Time frame and time span of how long will it take? Do we own the mold?”
- Agree on resin and MFI: “We should have a matte and good impact. What level do you suggest? Is the melt flow suitable to walls 2mm thick?”
- Check draft and parting line: “We can add draft to all verticals of Type: 2 deg draft; more to textured faces. Let us leave the parting line to the bottom.”
- Arrange the position of the gate: “Between the boss and the back face- gate- can we have knit lines run through the logo?”
- Cold runner is okay, please, what percentage regrind will not affect the appearance?
- Ejection plan: “Locate the ejector pins in the non-cosmetic ribs and inside.”
- Cycle time and cost: “So what is the goal cycle time? Where shall we core out, should one of them be thick?”
- What is the required press tonnage and what effect does this have on the schedule?
- Quality and QC: What are tolerable limits? How shall we proceed in regard to the first article check?
Fast Design Tricks
- Ensure that the walls have equal thickness throughout the walls. The range between 1.5 and 2.5 mm (as per the resin) is a normal range which balances strength and cooling time. Sinks and warping occur during situations when there is an abrupt change in thickness.
- Rib rather than thickening. Give it some ribs to stiffen it and not to make the walls thick. In order to minimize sink, initially, the rib thickness should be approximately 60 percent of the adjacent wall thickness.
- Put in a draft early. A minimum of 1-2 degree on smooth walls and 3-5 degree on rough walls.
- Coring is a good thing. To cool quicker and sink less hollow out thick bosses and large portions.
- The fillets abound everywhere. Stress builds up in the sharp corners on the inside which retards flow. A fillet of 0.5 to 1 mm can help.
- Texture hides marks. Light textures have the ability to conceal small sink, knit lines and ejector marks only to a certain extent.
- Plan for assembly. Two simple snap-together parts can in some cases perform better than one complex part with a lot of slides.
First Time Run Cost Snapshot
The following ranges can be used in order to establish expectations, although all projects are different:
- An aluminum prototype or bridge mold with a single cavity may cost between $3,000 and $15,000 or more depending on the size and complexity of the prototype.
- Multi-cavity production mold of steel: $15,000 to $100,000 and above. There is an increase of costs due to complex parts and hot runners.
- Price per part: can be a few cents where the quantity is high and more than a few dollars where the quantity is low. The most important are cycle time, price of resin and scrap rate.
- Lead times: Simple aluminum tools may require 3 to 6 weeks to be delivered, and production steel tools may require 8 weeks or more. Alterations in the design and DFM require more time but tend to save money in the future.
(Nothing is binding; it is suggested to take more than one quote).
Ordinary Ills
- Sink marks: Dents on thick places, typically around ribs and bosses. Fix it by using coring, thinning of the ribs or altering the process.
- The warping: occurs when the parts become twisted or bent due to uneven cooling or due to residual stress. The walls can be all the same, can be better cooled, or can be changed.
- Knit lines: (or weld lines) are lines that are readily observed that two flow fronts come together. Whenever they go over high-stress features, they become weak. Placement of gates and flow are useful.
- Short shots: No pressure, temperature or venting sufficient to fill up completely.
- Flash: Fin like pieces of thin plastic along the parting line, commonly due to wear and tear of the tooling or tonnage.
- Burn marks/dieseling: gas which becomes too hot and is trapped in the cavity; improved venting assists.
Conversations about fixing things will be more productive and quicker, in case you know these words.
Prototype and Production
- DFM Pass and CAD: Early submission of your CAD files. Request a DFM (Design for Manufacturability) inspection of the draft, wall thickness, gating and ejection.
- Trial Test on Material: Only use one or two resins. Hopefully, you could have a tiny test with a similar mold as the one you are utilizing to determine how it flows and appears.
- Bridge Tool: To check the design, demonstrate that it is needed, and receive feedback, make a single-cavity aluminum tool.
- T1 Samples: The first shots. Test the cosmetic, size and functionality. Anticipate modifications, such as cleaning the gate vest, relocated knit line and pin marks.
- Repeat: Modify the mold steel (perhaps with the so-called steel-safe strategy, i.e. leave the material that can be cut later), modify the parameters and select the final resin color.
- Scale: Change to multi-cavity steel tooling when it is high enough to switch to a hot runner.
A Mini-Glossary
- Tooling/Mold: It is the metal block that provides your part with its form.
- Plastic Material: The resin; it is chosen by the level of working and the cost.
- MFI: Ease of the melted resin movement.
- Taper: To release parts out of the mold.
- Parting Line: This is the line of contact with the two halves of the mold.
- Gate: This is the opening that the plastic enters the part.
- Runner/Sprue: These are the tracks on which plastic is delivered to the gate.
- Ejector Pins: Forceful components are expelled when they have cooled down.
- Cycle Time: It is one complete cycle of the mold; this is what primarily influences cost.
- Tonnage: This action is required to maintain the closure of the mold.
Frequently Asked Questions
- Q: Can the mold be 3D printed to save money? A: Yes, but very short runs and only in shapes, particularly where using high-temperature material or where it contains metal. Nevertheless, you will have to tolerate a reduced number of resin choices, longer processes and reduced life of tools. Most commercial prototypes are best accommodated by aluminum tooling.
- Q: But what number of cavities shall we start with? A: When you are still learning, single-cavity is safer and less expensive. When demand has been established, add more cavities, 2-4 or even more, to reduce the unit cost.
- Q: Do I have an urgent requirement of a hot runner? A: Not always. Cold runner sensible regrind is okay where volumes are low to mid. Consider hot runners when you grow or how the cosmetics or garbage are so important.
- Q: Which tolerances can you have? A: It is dependent on the resin, the size and the shape. In the majority of small and medium parts, the tolerance is +-0.1-0.2 mm. The tightness of the tolerances however can be done with critical features which will be expensive and will need a lot of control of the process.
- Q: How can we make surface cosmetics safe? A: Place gates and ejector pins on concealed faces, wisely use textures and align parting lines with shadow lines. To prevent scuffs, instruct individuals on how to work and package molded parts.
What You Should Do Next
- Set volumes and goals. Pilot amount, annual forecast, and budget.
- Lock in basic shapes. Blueprint, fillets, and the same thickness of the wall around.
- Make a short list of resins. Appearance and performance (impact, heat, chemicals).
- Ask for feedback from DFM. Also, be sure to inquire about parting line, gates, ejector pin marks, and undercuts.
- Select a strategy of your tools. When you are still new to the market, then you can begin with an aluminum bridge tool.
- Prepare the inspection arrangements. Set tolerances, initial studies of articles and cosmetic standards.
- Budget towards iteration. At least one set of changes should occur after T1.
- Write down everything. Control of revision of CAD, resin grades, color codes and process settings.
Last
A well thought-out plan is successful in injection molding. With all these ten words in your vocabulary, you will be able to converse with manufacturers more efficiently, you will be able to make better trade-offs and you will be able to get your idea to the shelf with less surprises.
Do you have a part in mind? You can email me a screenshot of your CAD file (or even a napkin sketch) and I will email you a quick DFM pass in the language we have just discussed.

