Beginner’s Guide: Understanding Undercuts And Their Impact On Design Choices
You know what’s funny? Most people walk past beautifully designed products every single day without realizing there’s this whole invisible world of manufacturing constraints shaping what they see. And right at the heart of that world sits something called an undercut—a feature that can make designers either pull their hair out or get really creative, depending on how you look at it.
If you’re just starting out in product design, manufacturing, or even just curious about why certain products look the way they do, understanding undercuts is going to change how you see everything. Honestly, once you learn about them, you’ll start spotting their influence everywhere—from the plastic casing on your phone to the intricate details on your car’s dashboard.
What Exactly Is An Undercut, Anyway?

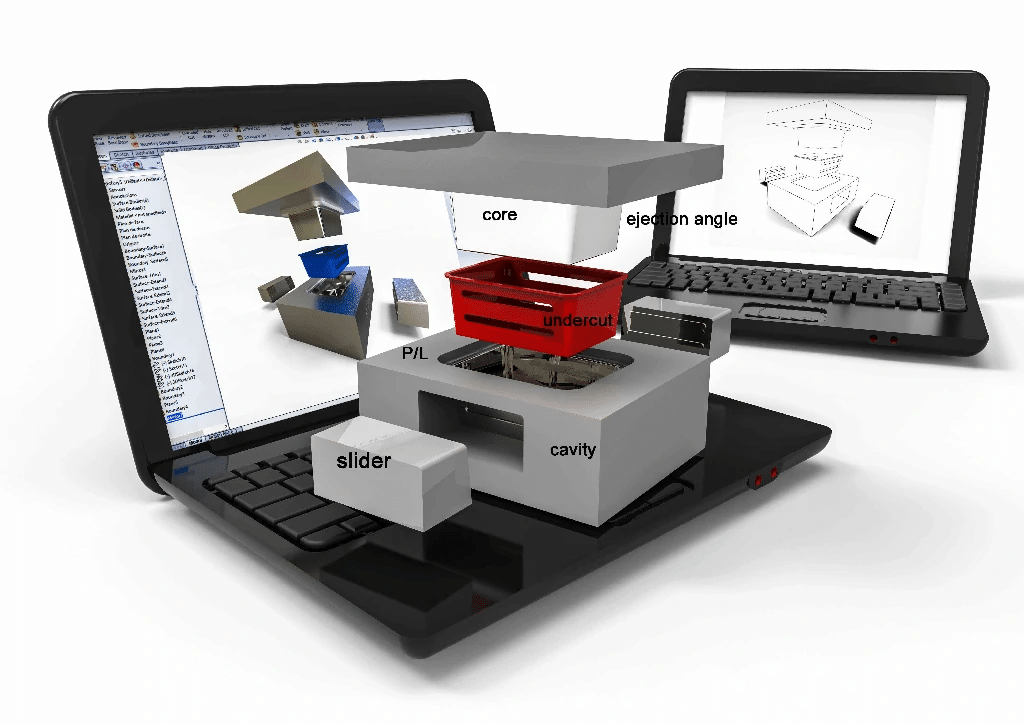
Let’s start simple. An undercut is basically any feature or geometry in a part that prevents it from being removed cleanly from a mold. Think of it like trying to pull a bottle out of a box that’s too small—you can’t just lift it straight up without something getting stuck or breaking.
In manufacturing terms, particularly in injection molding or casting, an undercut is any portion of the part that’s recessed or protrudes in a way that blocks the normal direction of mold opening. Picture a simple cup—you can pull it straight out of a mold, right? Now imagine that same cup but with a handle that curves back toward the body. That handle? That’s an undercut. The mold can’t just split apart and release the part cleanly anymore.
Here’s the thing, though—undercuts aren’t inherently bad. They’re just complicated. And complicated usually means more expensive, more time-consuming, or sometimes just plain impossible with certain manufacturing methods.
Why Should You Care About Undercuts?
I get it. If you’re sketching designs or working in CAD software, you’re probably thinking about aesthetics, functionality, user experience—the sexy stuff. Manufacturing constraints feel like someone else’s problem, right? Wrong. Dead wrong, actually.
Understanding undercuts early in your design process can save you from some seriously painful conversations later. I’ve seen designers create absolutely gorgeous concepts only to have a manufacturing engineer walk in and say, “Yeah, this is going to cost three times what you budgeted.” That’s a conversation nobody wants to have, especially when you’re on a deadline.
The reality is that every design choice has consequences. That elegant curve you added? It might require a complex side-action mechanism in the mold. That textured grip feature? Could need hand-loaded inserts. These decisions ripple through the entire production process, affecting cost, lead time, quality, and even whether your product can be manufactured at all.
The Real-World Impact On Your Wallet
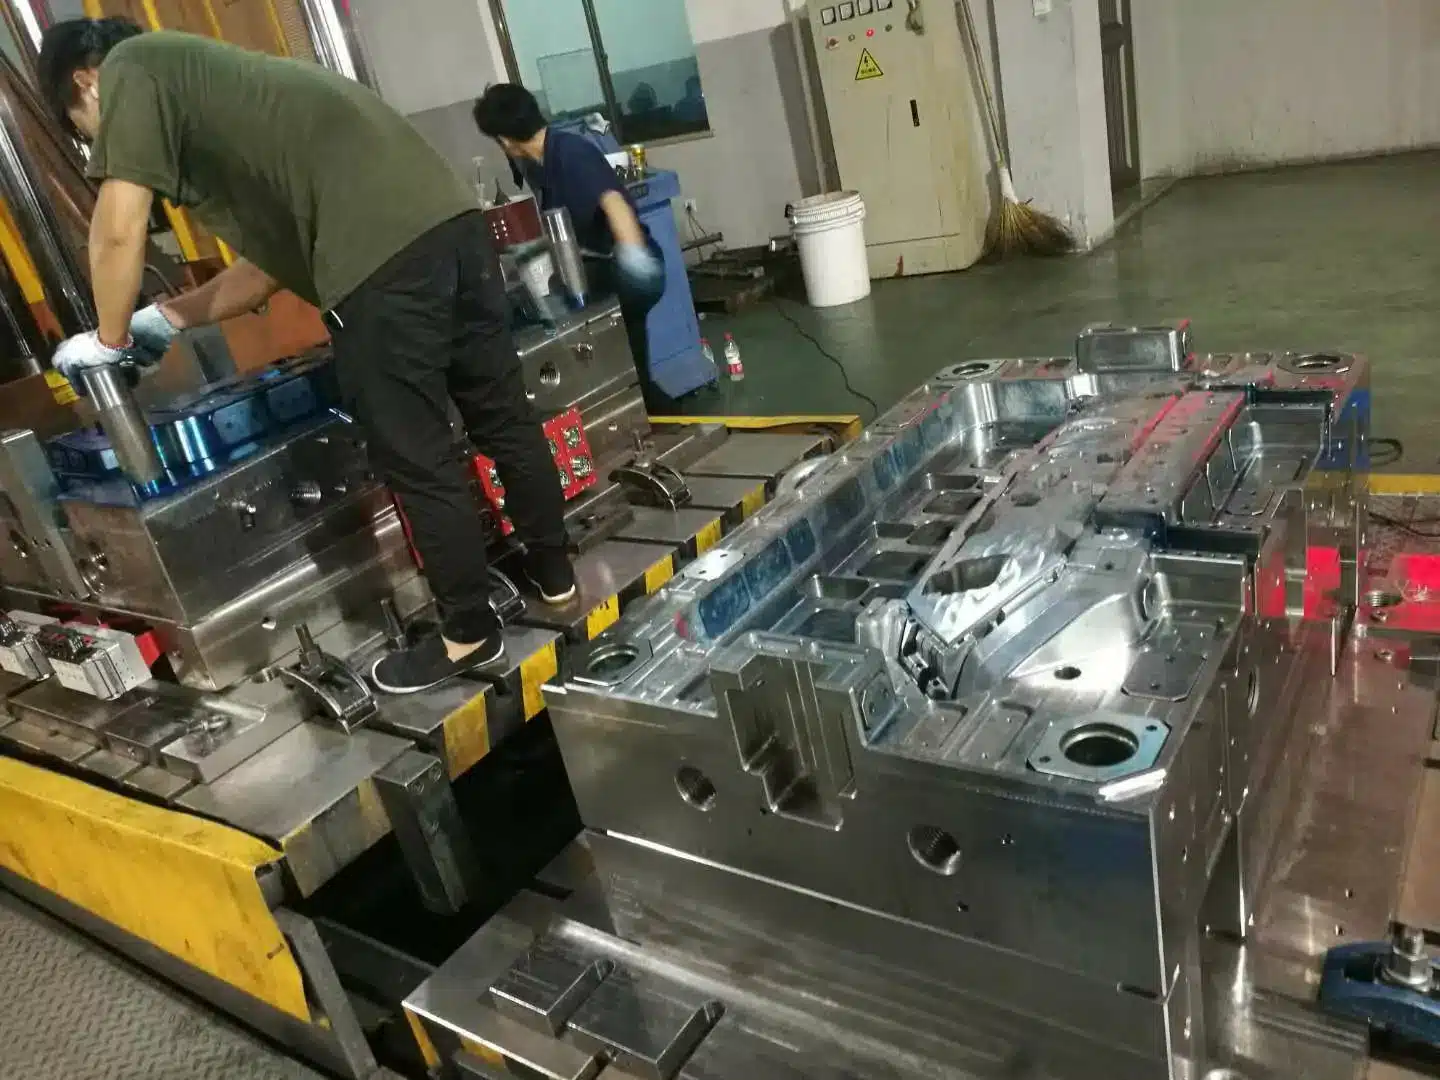
Let’s talk money for a second, because that’s where undercuts really start to matter. A simple two-part mold—the kind that just opens and closes like a clamshell—is relatively affordable. You’re looking at maybe a few thousand dollars for a basic plastic part, depending on size and complexity.
Now add an undercut that requires a side-action or a lifter mechanism. Suddenly you’re not just adding a feature; you’re adding moving parts to the mold itself. Those mechanisms need to be precisely timed, maintained, and they increase the cycle time for each part. Your mold cost might jump from five thousand to fifteen thousand dollars. Maybe more.

And that’s just the tooling. Each production cycle takes longer because those side-actions need to move in and out before the main mold can open. Time is money in manufacturing—literally. If your cycle time goes from thirty seconds to forty-five seconds, you’re producing fewer parts per hour, which means higher per-unit costs.
Common Types Of Undercuts You’ll Encounter
Not all undercuts are created equal. Some are minor headaches; others are full-blown migraines. Let me walk you through the usual suspects.
External undercuts are probably the easiest to visualize. Think of a snap-fit hook on a plastic enclosure or the threads on a bottle cap. These features stick out and prevent the part from being ejected straight from the mold. They’re common, and manufacturers have developed pretty standard solutions for dealing with them.
Internal undercuts are trickier. These are recesses or features inside a part—like the threads inside a bottle or a groove on the interior wall of a housing. You can’t see them from the outside, but they’re there, complicating the molding process. These often require collapsible cores or other specialized tooling.
Then you’ve got what I call “accidental undercuts”—features that weren’t meant to be undercuts but end up functioning as one because of the parting line location or draft angle issues. These are the sneaky ones that catch beginners off guard. You designed a simple chamfer, but depending on where the mold splits, it might create an undercut condition.
Design Strategies: Working With (Or Around) Undercuts
So what do you actually do about undercuts? You’ve got options, and the right choice depends on your specific situation—budget, production volume, aesthetic requirements, and functional needs all play a role.
The simplest approach? Eliminate them entirely. Redesign the part so it can be molded with a straight pull—no side-actions, no complications. This isn’t always possible, especially if the undercut serves a critical function, but it’s worth exploring. Sometimes a small design tweak can remove an undercut without sacrificing much.
Can you reorient the part? Changing the parting line location might turn an undercut into a non-issue. What’s an undercut from one direction might be perfectly moldable from another angle. This requires thinking three-dimensionally about how the mold will actually work, which takes practice but becomes intuitive over time.
If you can’t eliminate the undercut, consider whether it can be flexible enough to snap past the mold surface during ejection. This works for small, thin features made from flexible materials. Think of those plastic clips that hold battery covers in place—they’re technically undercuts, but they flex during ejection and snap back into shape afterward.
Advanced Solutions For Necessary Undercuts
Sometimes you just need that undercut. The function demands it, the aesthetics require it, or the client insists on it. Fair enough. That’s when you start looking at more sophisticated tooling solutions.
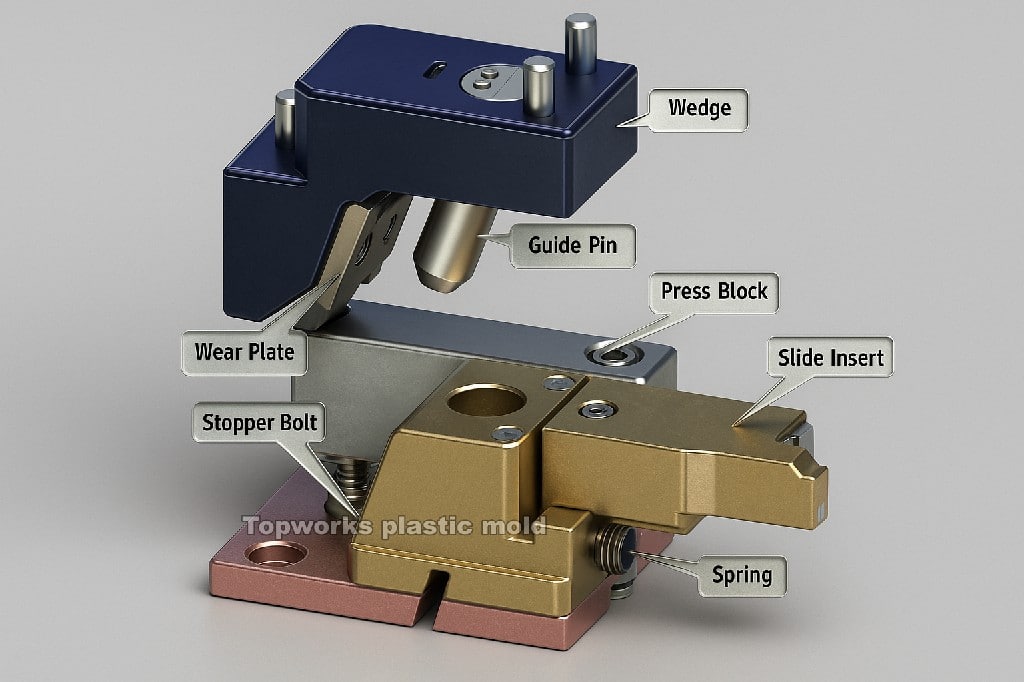
Side-actions (also called slides) are probably the most common solution. These are sections of the mold that move perpendicular to the main opening direction. Before the mold opens, the side-action retracts, clearing the undercut feature. Then the main mold can open and the part ejects normally. They’re reliable, but they add cost and complexity.
Lifters are similar but move at an angle rather than straight sideways. They’re often used for features that are partially undercut or when space constraints prevent a full side-action. Lifters can be more compact, but they’re also more mechanically complex.
For internal undercuts, collapsible cores are sometimes the answer. These are cores that can collapse inward or split apart, allowing them to be withdrawn from internal features. They’re clever but expensive and require careful maintenance.
Hand-loaded inserts are another option, particularly for low-volume production. A worker manually places an insert into the mold before each shot, creating the undercut feature. After molding, the insert is removed by hand. It’s labor-intensive, which makes it impractical for high volumes, but it can be cost-effective for smaller runs.
Material Considerations Matter More Than You Think
The material you choose can dramatically affect how you handle undercuts. Some plastics are more forgiving than others.
Flexible materials like thermoplastic elastomers or soft polyethylene can often be designed with features that technically qualify as undercuts but can flex during ejection. The part deforms slightly as it’s pulled from the mold, then returns to its intended shape. This only works for certain geometries and materials, but when it does, it can save significant tooling costs.
Rigid materials like polycarbonate or ABS don’t have that luxury. An undercut in a rigid material almost always requires a mechanical solution in the tooling. There’s no flexing your way out of it.
Material shrinkage also plays a role. As plastic cools in the mold, it shrinks. Different materials shrink at different rates, and this shrinkage can either help or hurt when dealing with undercuts. A feature that’s technically an undercut in the CAD model might clear the mold surface after shrinkage occurs. Or conversely, a feature that looks fine in CAD might become an undercut problem once shrinkage is factored in.
The Volume Question: When Do Undercuts Make Sense?
Production volume changes everything. What makes sense for a million units might be completely impractical for a hundred.
For high-volume production, investing in complex tooling with side-actions and lifters often makes sense. Yes, the upfront tooling cost is higher, but when you’re spreading that cost across hundreds of thousands of parts, the per-unit impact becomes negligible. Plus, automated solutions mean faster cycle times and lower labor costs.
For low-volume production or prototyping, you might take a completely different approach. Hand-loaded inserts, secondary operations, or even 3D printing might be more economical. The tooling is simpler and cheaper, even if each individual part takes longer to produce or requires additional processing.
There’s a crossover point somewhere in the middle where the decision gets interesting. Maybe you’re looking at ten thousand units. Is it worth spending an extra eight thousand dollars on tooling to save thirty cents per part? The math says yes, but what if your forecast is uncertain? What if the design might change? These are the judgment calls that separate experienced designers from beginners.
Secondary Operations: The Undercut Workaround
Sometimes the smartest move is to mold a simpler part and add the undercut feature afterward. This is where secondary operations come in.
Drilling, milling, or cutting can add features that would be impossible or impractical to mold. Need a precise hole at an odd angle? Drill it after molding. Want a complex internal geometry? Maybe the part can be molded in two pieces and assembled later.
Ultrasonic welding, heat staking, and snap-fit assembly all enable designs that would be nightmares to mold as single pieces. Yes, you’re adding process steps, but you’re also keeping the molding simple and the tooling affordable.
The trade-off is always between tooling complexity and process complexity. More complex tooling means simpler production but higher upfront costs. Simpler tooling with secondary operations means lower initial investment but more steps in production. Neither is inherently better—it depends on your specific circumstances.
Learning To See Like A Manufacturer
Here’s something nobody tells beginners: the best designers develop a sort of sixth sense about manufacturability. They can look at a design and immediately spot potential issues. That skill doesn’t come from reading articles like this one—it comes from experience, from making mistakes, and from spending time around actual manufacturing equipment.
But you can accelerate that learning. Start by examining products around you with a critical eye. Look at that plastic remote control. Where’s the parting line? Can you spot evidence of side-actions or other special tooling? That little witness mark on the side—that’s probably where a lifter was.
Talk to manufacturers early and often. Don’t wait until your design is finalized to get manufacturing input. The best collaborations happen when designers and manufacturers work together from the beginning. A good manufacturing partner will help you understand the implications of your design choices and suggest alternatives you might not have considered.
The Future Is Changing The Rules
Technology keeps evolving, and that’s changing how we think about undercuts. Additive manufacturing—3D printing—doesn’t care about undercuts at all. There’s no mold to extract the part from, so design freedom is nearly unlimited. For low-volume production or complex geometries, additive manufacturing is increasingly viable.
Multi-material molding and overmolding techniques are also expanding what’s possible. You can mold a rigid structure and then overmold a soft grip feature in a single process, creating complex geometries that would be difficult or impossible with traditional single-material molding.
Advanced simulation software is getting better at predicting manufacturing issues before you cut steel for a mold. You can virtually test different parting line locations, evaluate draft angles, and identify potential undercuts all in the digital realm. It’s not perfect, but it’s getting impressively good.
Wrapping Your Head Around It All
Understanding undercuts isn’t just about memorizing definitions or learning technical solutions. It’s about developing a mindset that considers manufacturing from the very beginning of the design process. It’s about recognizing that every curve, every feature, every detail you add has real-world implications.
The designers who succeed aren’t necessarily the ones with the most creative ideas—they’re the ones who can balance creativity with practicality. They know when to push the boundaries and when to work within constraints. They understand that limitations can actually drive innovation rather than stifle it.
Start simple. Practice identifying undercuts in existing products. Sketch designs and think through how they’d be manufactured. Talk to people who actually make things for a living. The knowledge will come gradually, but once it does, you’ll find yourself making better design decisions almost automatically.
Because at the end of the day—okay, I promised myself I wouldn’t use that phrase, but you get the point—design isn’t just about making things look good. It’s about making things that can actually be produced, at a cost that makes sense, in quantities that meet demand, with quality that satisfies users. Undercuts are just one piece of that puzzle, but they’re an important piece. Master them, and you’re well on your way to becoming not just a designer, but a designer who understands how things really get made.

